
Ever wonder how WordPress plugins work? Today, I’ll show you how to create a custom WordPress plugin from scratch!
This plugin won’t be within the directory that requires approval from WordPress. Instead, you’ll build your own in a code editor and upload it to your website.
I drew inspiration and built upon the work of Bill Erickson, a developer who outlined the basic plugin creation process in his blog post. He provides his code example on GitHub.
You can grab my skeleton code below as a starting point for your custom plugin and follow along!
Plugin Code Framework
Open the files in your favorite code editor — my preferred option is Notepad++. It’s a lightweight code editor with a feature to save your “session” of open files. Clicking this session file (session.npp) will open all the associated plugin files in their own tabs.
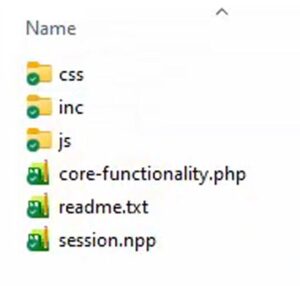
In the top-level folder, we have only two main files:
- readme.txt – This file provides information about the plugin.
- core-functionality.php – This file is what WordPress pulls from to show your plugin in the admin area.
The latter PHP file includes all the other sub-folder files to perform our desired functions. We define the plugin directory and URL path here, which we’ll reference in the function files.

We include two main files within core-functionality.php:
- insert-head.php
- insert-body.php
This setup will allow you to custom code things into the website HTML head or footer. You can find these files in the “inc” sub-folder.
There are two more files, each in their extension sub-folder:
- your-style.css – This file is responsible for the custom styles.
- your-script.js – This file handles Javascript interactivity.
Of course, you can replace “your” with anything you want. I like using a unique acronym for the website.
This infrastructure provides a solid framework for building your plugin with PHP, HTML, CSS, Javascript, and jQuery.
Add Code to HTML Head
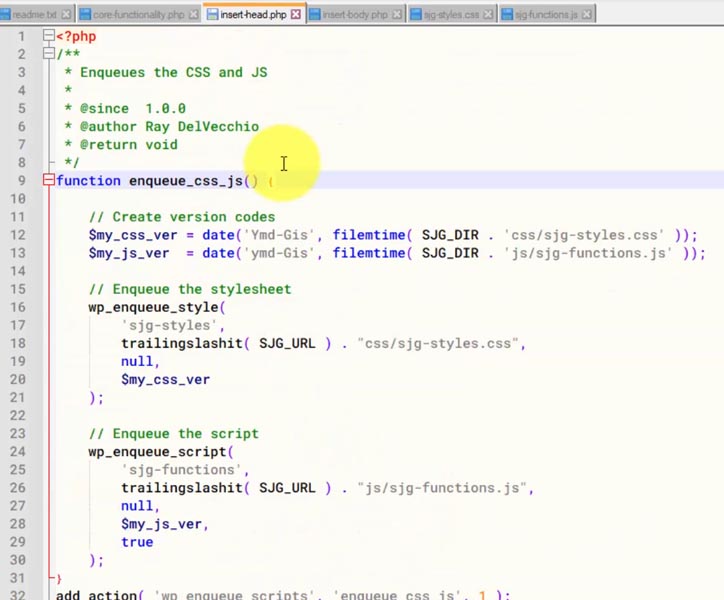
Now, let’s take a look at insert-head.php. Here, you’ll find WordPress developer functions typically added to your functions.php file, which is part of most themes.
This core functionality plugin is much like your functions.php file, just in a different location.
The primary reason to use a plugin instead is when you don’t have a child theme or if you want to keep customizations during a theme switch. A child theme is necessary when customizing your functions.php because, without it, you risk losing your customizations when the parent theme is updated.
Placing the code in a plugin like this makes your functions theme-independent.
In insert-head.php, we’re taking advantage of two built-in WordPress functions:
- wp_enqueue_style() – To include our CSS file.
- wp_enqueue_script() – To include our JS file.
📝 NOTE: WordPress has an extensive developer reference on their website to view & search for available functions and get the technical specifications on how they work.
Our custom enqueue_css_js() function adds our two files and appends version numbers based on the date of the last edit. This version is especially useful for bypassing cache issues, i.e., you make a change on the backend that doesn’t appear on the live website.
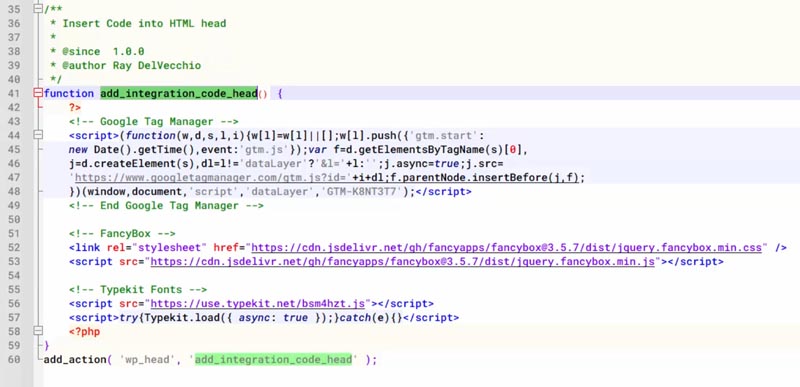
The next custom function is add_integration_code_head(), which — you guessed it — allows you to copy/paste HTML code from 3rd-party services to the <head> of the HTML document using the wp_head WordPress hook.
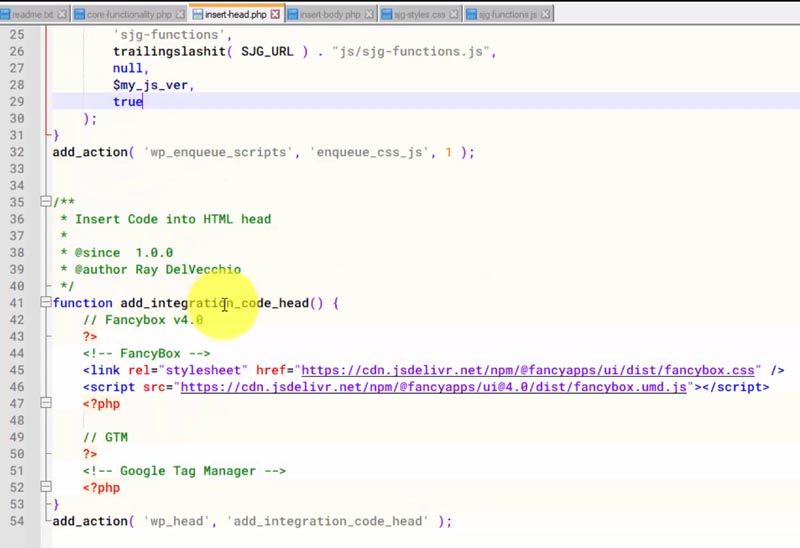
The starting code above inserts FancyBox, a JS library that provides a modal popup for photo galleries. There’s also an empty comment as a placeholder to paste in Google Analytics or Tag Manager code.
Add Code to HTML Body
Now open insert-body.php, and the add_integration_code_body() function inserts this code to the end of the HTML document using the WordPress wp_footer hook.
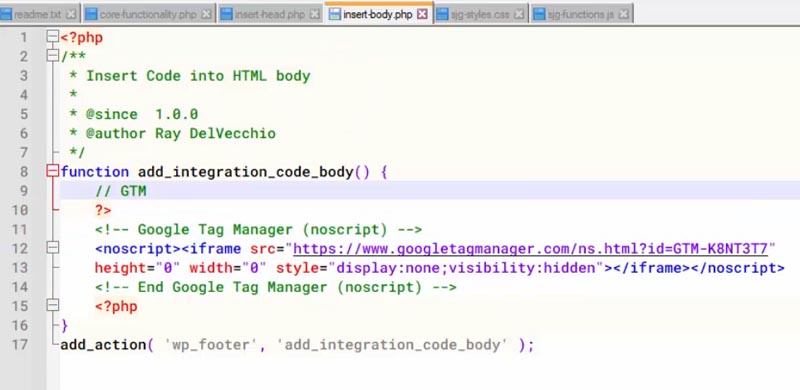
Utilizing WordPress hooks like wp_head and wp_footer grants you the power to modify almost any part of your website.
The starting code includes a place for Google Tag Manager (GTM), which requires code in both the HTML head and body.
Website Integration Code Example
Most of my websites are powered with Divi by Elegant Themes, and before understanding how to create a custom plugin like this, I was simply adding HTML code within Divi’s theme options on the integration tab.
The functions within the plugin mirror what you do in Divi’s theme options – they add code to your website’s HTML head or body.

Divi Visual Builder
The #1 WordPress theme on the entire internet to design your website with drag-and-drop!
Buy NowI may earn a commission if you purchase using my links which helps support this website.
This plugin project is a classic example of how WordPress offers multiple ways to accomplish the same task, and there’s rarely a single correct or best way to do it. Choose whatever method makes you most comfortable!
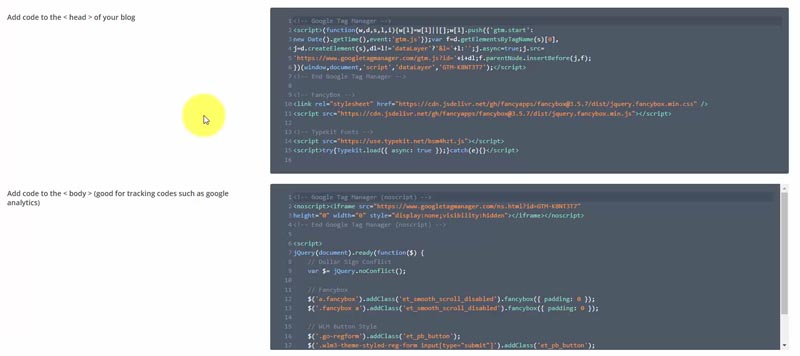
I’ll paste what I have from the Divi <head> section. Let’s examine the code for a moment.
We’re using a mixed PHP/HTML format by adding the closing PHP tag (?>) followed by the copied HTML code from Divi’s settings, which includes GTM, FancyBox, and Typekit Fonts.
It’s worth mentioning that you should add comments like I do to articulate what’s happening in the code. You’ll forget if you don’t touch this for a few days!
We can use either PHP or HTML comments here. A PHP comment starts with two forward slashes (single line) or forward slash asterisk (multi-line, ended by those characters in reverse), while an HTML comment is enclosed by <!– at the beginning and –> at the end.
<!-- This is an HTML comment -->

// This is a one-line PHP comment

/* This is a multi-line...
...PHP comment */
Now, we’ll move on to what I have published in the Divi <body> code section.
That includes GTM code, which I’ll copy into add_integration_code_body(), and the Javascript code to enable FancyBox on the HTML elements we want. We’ll adapt the latter to work with FancyBox v4 and add it to our Javascript plugin file, your-script.js.

In the code above, we’re using the Fancybox.bind() method to target anchor links with the class “fancybox” or within a parent element containing that class. Make sure to modify your code accordingly based on your specific use case.
For more information, refer to the WordPress developer reference.
Additionally, WordPress Stack Exchange and Stack Overflow are valuable forums for code questions and specific implementations.
Customize CSS Styles
CSS (Cascading Style Sheet) provides the flexibility to customize your site’s appearance effortlessly and override any UI bugs inherited from your WordPress template or a plugin.
I usually start with CSS that applies to the theme or plugins I frequently use, like Divi or Contact Form 7, to override the default styles. Then, I’ll add a few sitewide features.
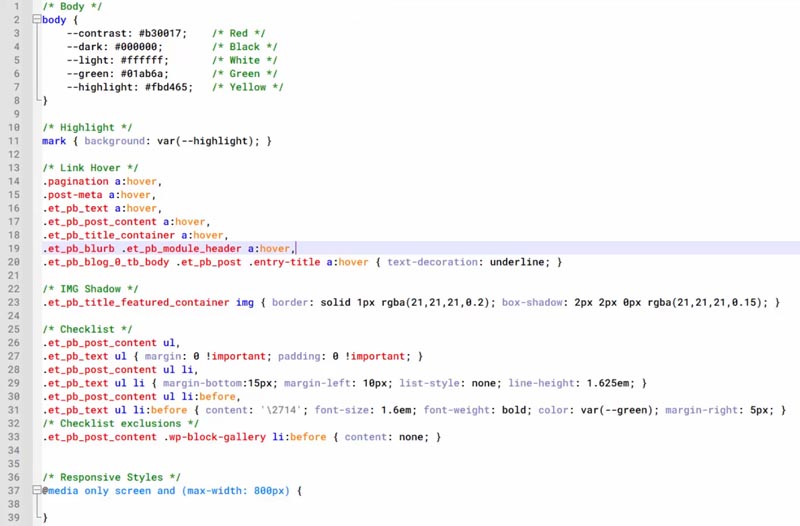
For example, we set CSS variables at the top level <body> element to allow you to adjust your site’s colors easily. Each variable below represents a specific color, defined by its hexadecimal code or name.
body {
  --contrast: red;
  --dark: black;
  --light: #ffffff;
  --highlight: yellow;
}
With these color variables established, you can now use them throughout your stylesheet. The code below adds the –highlight variable as the background color for an HTML <mark> element.
.mark { background: var(--highlight); }Lastly, consider responsive styling to maintain a consistent design across different screen sizes. We can do that in CSS using the media queries shown below.
@media screen and (max-width: 800px) {
  /* Styles for screens up to 800px wide */
}
@media screen and (max-width: 500px) {
/* Mobile-specific styles for screens up to 500px wide */
}Get granular with CSS by targeting HTML elements, classes, IDs, and combinations of each, applying any properties you’d like to get the exact look you want.
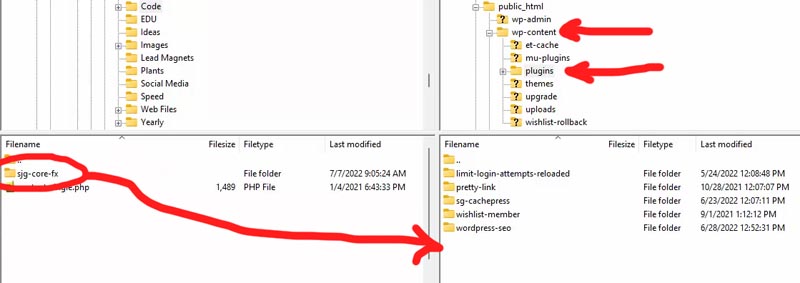
Upload & activate custom plugin via FTP
Now that you’ve set up your plugin files, it’s time to upload them to your web server with an FTP program such as FileZilla.
Using FileZilla, copy your plugin folder and its contents into your WordPress “wp-content/plugins” directory.
Return to your WordPress admin area and head to the “Plugins” page. You should see your new plugin listed. The name, description, version, and author you see come from the comments section within core-functionality.php.
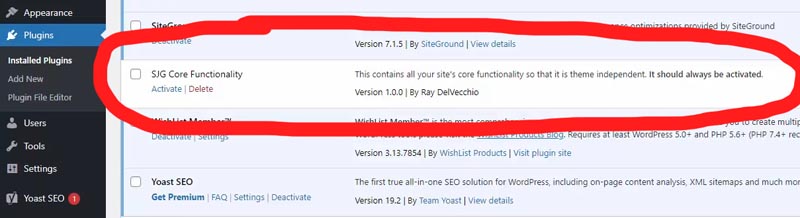
Hopefully, no errors will occur after you activate it!
Now, you can test its functionality to ensure everything is working as expected or debug any errors in your code if things go awry.
To do that, check your web hosting error logs, where you’ll find helpful messages informing which PHP function caused the problem. Plus, you can test live Javascript and CSS updates.
Don’t forget to grab the WordPress plugin starter code to try out this theme-independent method to customize your website!