
WordPress recently launched the new Twenty Twenty-Three theme alongside version 6.1 of the core content management software.
Like all the yearly themes developed by the WordPress team, it’s bare-bones when first installed and activated. We will use the “full site editing” (FSE) feature in today’s tutorial to transform this basic website into an urban photography portfolio.
Before we start…
Get the PDF guide to follow along at your own pace! 👇
Twenty Twenty-Three Tutorial Guide & Assets
Want this helpful free giveaway or training?
Twenty Twenty-Three Tutorial
Register Domain & Get Web Hosting
To get WordPress up and running, you’ll need to register your domain and get website hosting.
If you haven’t done that step already, I recommend HostGator as one of the most affordable options.

Launch with HostGator
Setup WordPress in minutes! 👇
Start NowI may earn a commission if you purchase using my links which helps support this website.
Install & Activate Twenty Twenty-Three
📝 Check out my newer Twenty Twenty-Four tutorial if you want to use the most current WP theme!
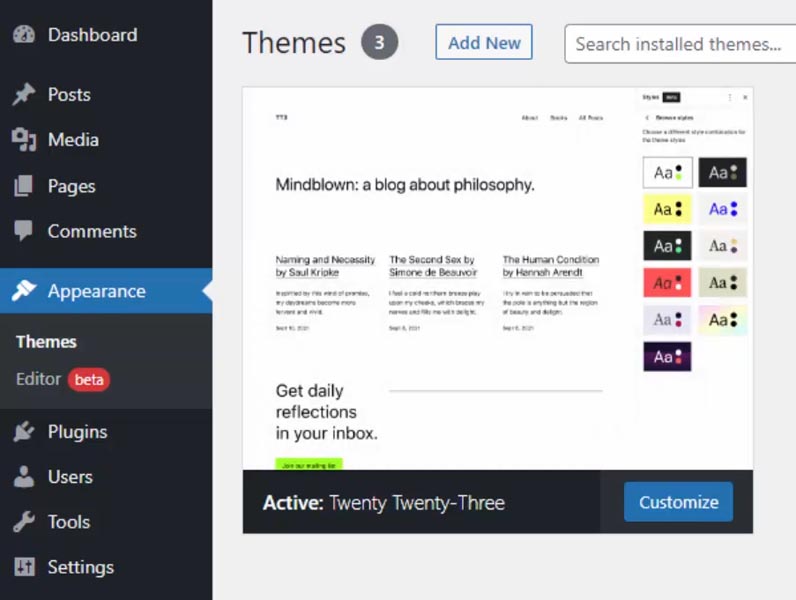
Go to the Appearance > Themes section, and it should be installed if you’ve upgraded your WordPress version. Otherwise, you can click “Add New” and search it out, then activate it.
Twenty Twenty-Three Tutorial Guide & Assets
Want this helpful free giveaway or training?
Publish Pages & Posts with Test Content
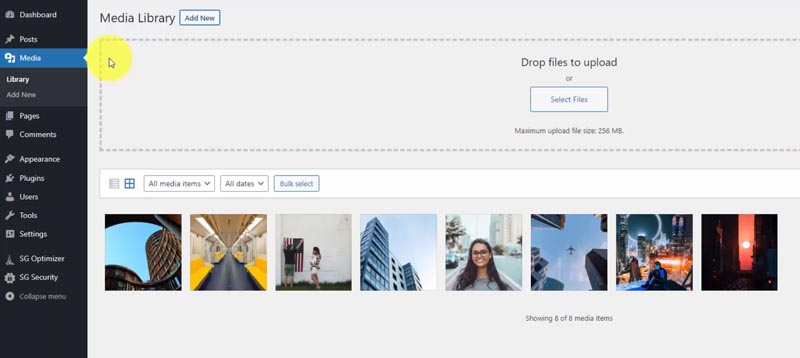
I will first add all my photos to the media library. You can choose free stock photos from Pexels.com, which has an excellent selection.
Go to Media from the WordPress admin sidebar, and click “Add New” to upload your pictures.
Next, create a few pages and posts so that we have some content built out. This infrastructure will make designing our theme layout easier since you’ll see that content within the editor window and on the live website.
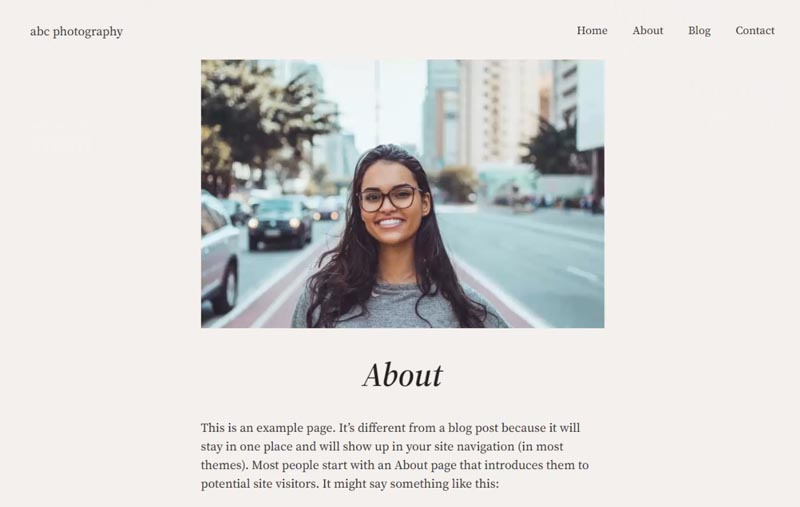
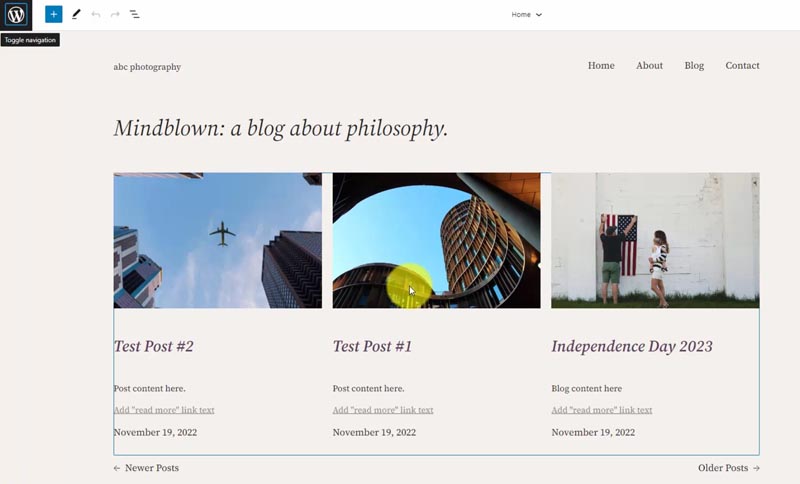
I’ll include four standard pages – Home, About, Blog, and Contact.
Since we already have a sample page, I’ll update the title to make it our “About” page.
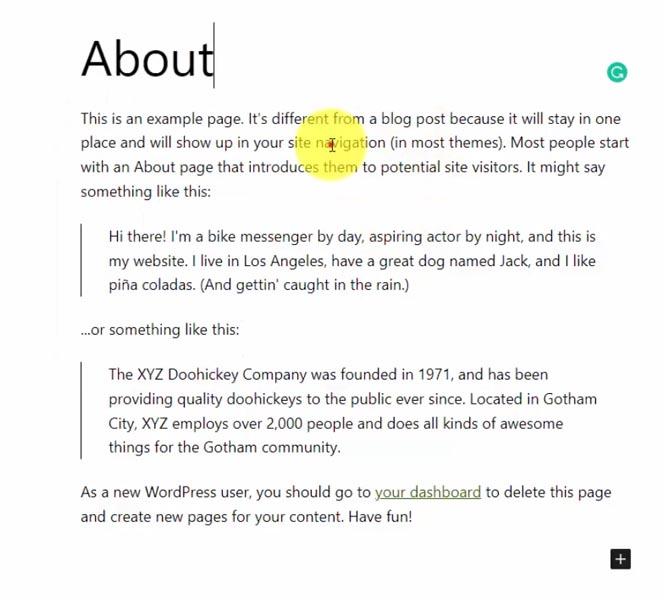
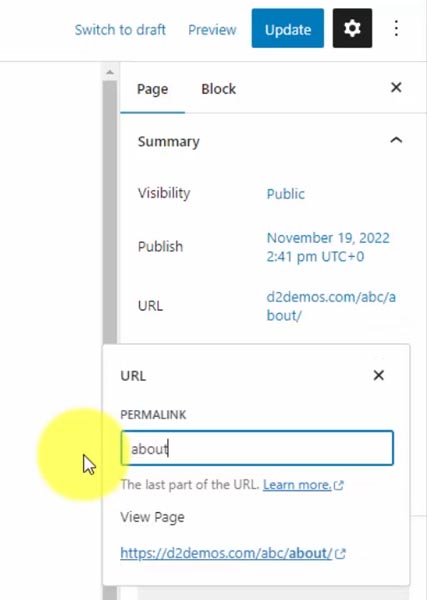
Once you publish a page/post, it sets the URL, which doesn’t get switched after changing an already published title (to avoid broken links). However, we can reset this URL manually by navigating to the “Page” tab in the right sidebar.
Look for the URL option under the Summary section that shows us the page permalink (currently “sample-page”), and we’ll change that to “about.”
Then scroll down to set the featured image. Of course, you can always upload new ones, but we’ll jump to the “Media Library” tab to select our one headshot photo.
Create 3-4 new pages and posts with featured images.
Let’s take a look at our site without any theme customizations.
WordPress Settings
Let’s walk through some basic settings. Then we’ll start creating with Twenty Twenty-Three.
Navigate to the Settings > General menu to change your site title and tagline, then save.
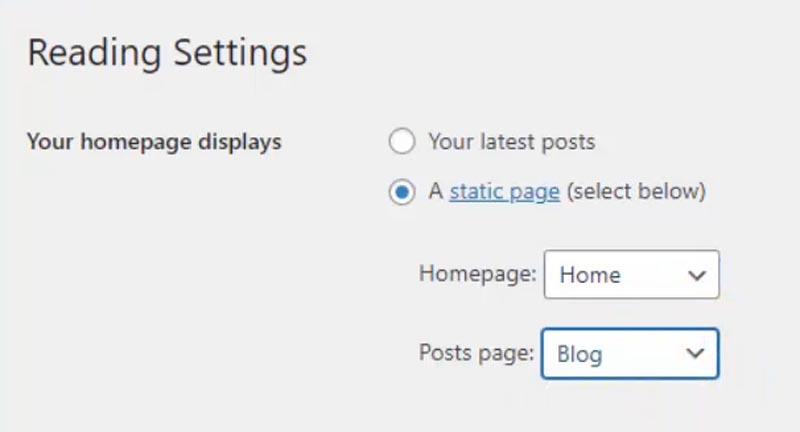
We will build a custom homepage layout instead of the default setting, which shows our blog posts on the homepage.
To change this, go to Settings > Reading, and change “Your homepage displays” to “A static page.” You can manually set your Home and Posts page to any published pages on your site and save.
You should look at two other sections: Discussion (commenting settings) and Permalinks (default URL structure). For the latter, you mustn’t change this after your site’s been around a while. I always recommend setting it to “Post Name” from day one.
WordPress Full Site Editing
Go to Appearance > Editor, and that’s where we’re going to implement all our template customizations. It will automatically show one of your templates, which you can identify from the top-center drop-down.
In the top-left, you’ll see a three-line icon that toggles list view (☰), showing the hierarchy of blocks making up the template.
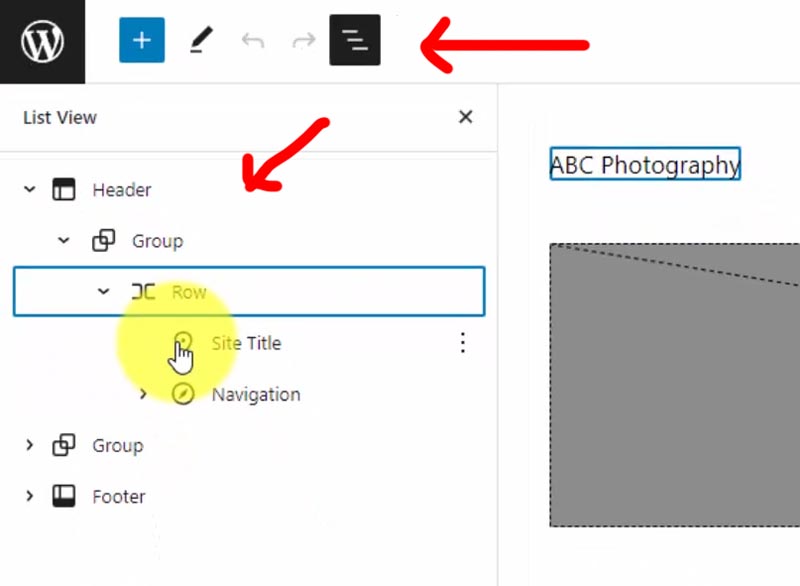
When you click on a block in the visual editor window, look at the bottom-left of the screen. You’ll see where that block is within the template hierarchy.

Set Default Theme Styles
To make quick design changes, select the two-color circle icon (◐).
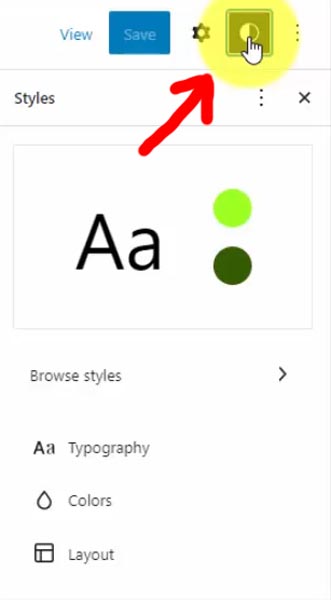
A new feature of the Twenty Twenty-Three theme is pre-defined styles. Click on the “Browse styles” option to view 11 options that completely customize your template without requiring manual customizations.
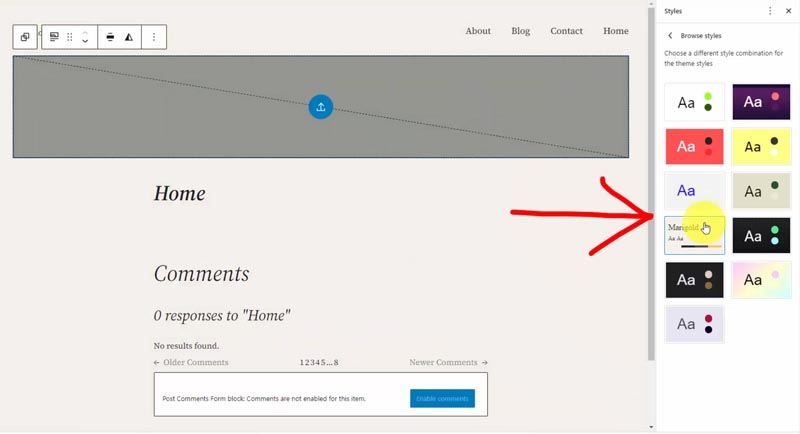
We’ll select Marigold and save. When you hit the Save button, the right sidebar confirms what parts of your theme you’re updating. In this instance, we’re only updating the Custom Styles.
If you’re an experienced WordPress user like me, you had to know HTML & CSS code to customize like this with older themes. And even with full-site editing, there are styles you can’t control with the visual designer and little bugs you may encounter.
So, if you ever need to override something with CSS, navigate to the Customizer, which WordPress removes from the Appearance sub-menu. You just have to access it directly from the URL:
yourdomain.com/wp-admin/customize.phpThat’s where you can paste code within the “Additional CSS” section.
Twenty Twenty-Three Tutorial Guide & Assets
Want this helpful free giveaway or training?
How to Customize Your Theme Templates
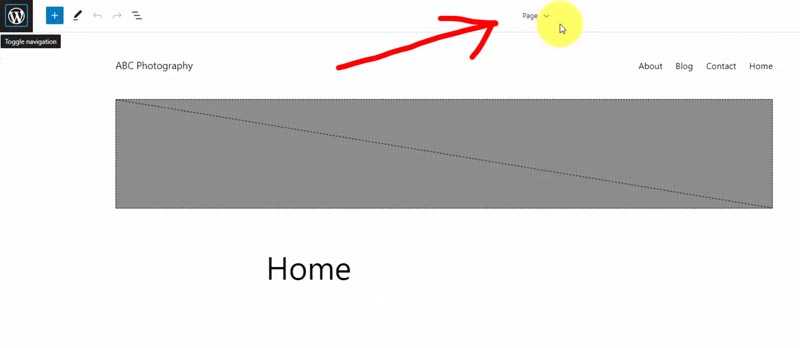
Select the top-center drop-down from your template editor window and click “Browse all the templates.”
These are all the templates that generate every page/post on your website.
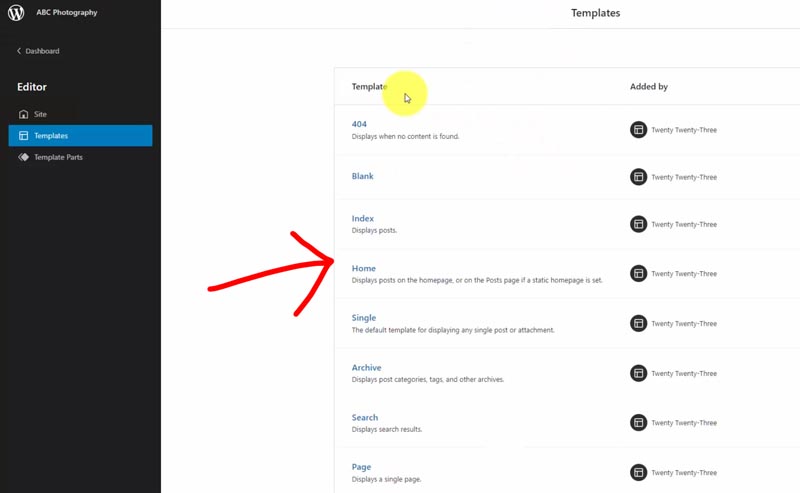
We were looking at the “Page” template, which displays your pages.
The “Single” template displays individual blog posts.
The “Home” template is confusing. It displays your most recent blog posts, but if you have a static homepage set (we do), it shows on your “Posts page” selected within the WordPress settings. So this Home template runs your blog, whether on the homepage or elsewhere.
Hopefully, that doesn’t twist your brain into a pretzel!
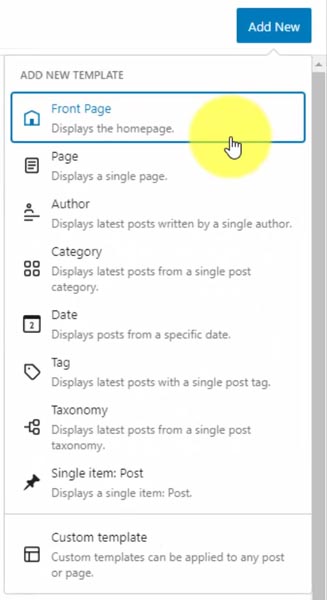
Create Front Page Template
We’ll create a new template specifically for our homepage.
Click “Add New,” and you’ll see pre-built template types. Let’s go with a “Front Page” template that’ll override the Page template.
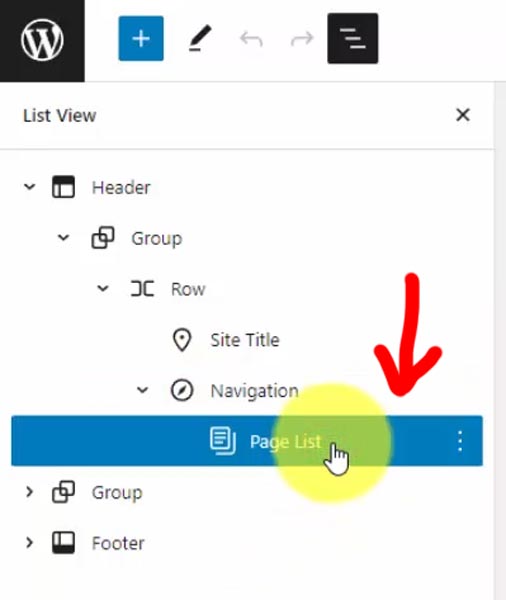
I like to select blocks through the list view (☰).
Go into the Header template part and expand the nested hierarchy. The current Navigation menu lists all the published pages on our site. I’d like to create a menu manually.
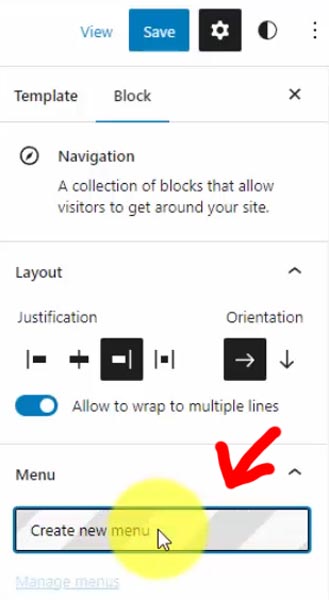
Select the Navigation block, and in the right-sidebar Block options, click “Create new menu,” and it’s called header navigation.
We must add items to it by searching for published pages or posts. Within the list view, there are now individual blocks that you can re-order.
Then I want to replace the current heading with the Site Tagline block.

Adjust the Typography size setting to “XX-large” so it matches closely. To see more options, select the three-dot icon (⋮) next to Typography. Let’s choose Appearance to make our text Bold Italic and then center it.
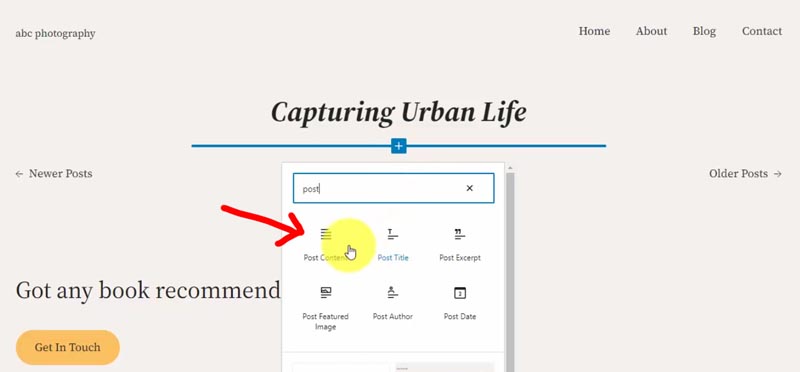
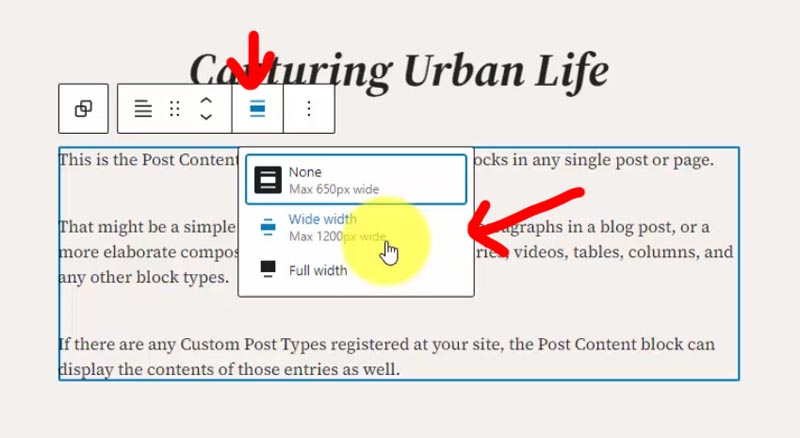
The following section will be a photo gallery, but instead of creating it directly within the template, we can do it from the WordPress page. To get that page content to display, you need to insert the “Post Content” block.
Then change the Align option to Wide width (max 1200 px), so there’s more area for our gallery.
Since we’re not showing blog posts here, you can remove the Query Loop block.
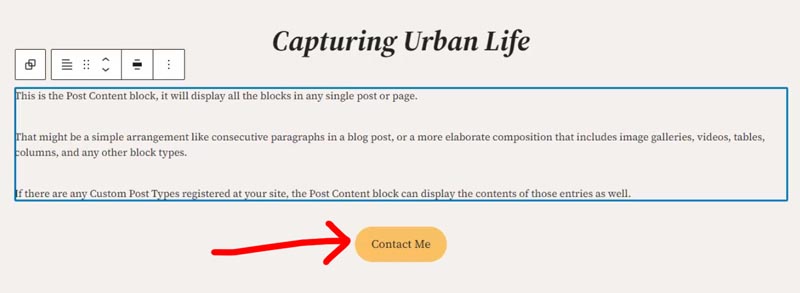
At the bottom, we got this two-column layout, but the right column has nothing except for a little divider. So we’ll move this button into the single-column flow.
This button is an excellent example of why using list view is handy. If you drag-and-drop the “Button” block, it won’t work. Instead, you have to select the higher-level “Buttons” block!
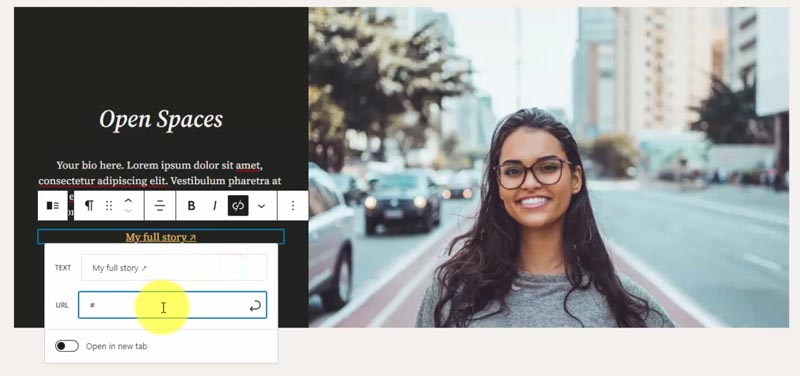
Once you move this button up, you can “Justify items center” and link it to the contact page, changing the text to “Contact Me.”
There’s a spacer below the button, and we’ll move it up by selecting the directional arrow. Then delete the “Columns” block.
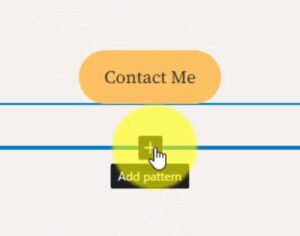
When you hover over the plus icon (+), sometimes it says “Add pattern,” but if we’re within a section, it’s “Add block.” Patterns are a done-for-you template of blocks, so let’s utilize one of them!
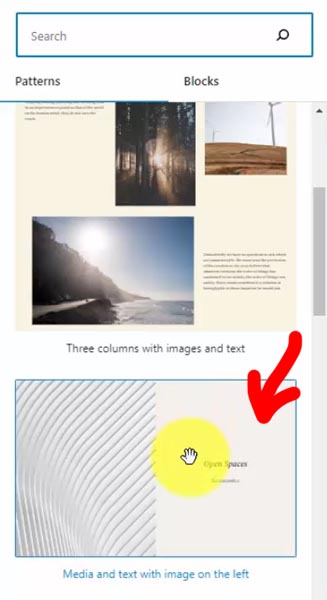
Click “Add pattern” and then “Browse all.” Next, choose “Media and text with image…” which we’ll turn into a small biography section.
I want to make this 1200 pixels like the post content area, but you don’t see that option. So we must nest our pattern within a Group block to enable that function.
Add a “Group” block, then drag-and-drop the “Media & Text” block into it.
Now that we have it within a group, there’s a new “Align” option to set it to Wide width. We can swap the photo from left to right using the “Show media…” option, then update the Media Width to 62%.
Replace the image with our headshot from the media library. Then change the background to our theme template contrast color, the text to our base color, and the links to our secondary yellow.
If any existing blocks don’t update to these new colors, just go into those blocks and manually switch them.
You can update the text, center it, and update the link to your “About” page.
Below the biography pattern, let’s add social icons within the same Group block.
Add a “Social icons” block, then hit the plus button to add your icons and links. Note that the social media icon won’t show on your live website if you don’t add a link.
Here’s where we may have spotted a bug with the editor. You can see that these icons are circular, but when you hover, they become square. That doesn’t happen on the live website, however.
Change the justification to center within the block settings, enable “Open links in new tab,” and adjust the block spacing. Then jump to the “Size” option to make them bigger or smaller.
Lastly, we’ll duplicate the social icons block and move it to the footer so it shows on every page. You could create a new template part or reusable block, but I will make these icons smaller in the footer. So we’ll copy this “Social Icons” block, paste it into the footer, change its size to Normal, and delete the existing paragraph text.
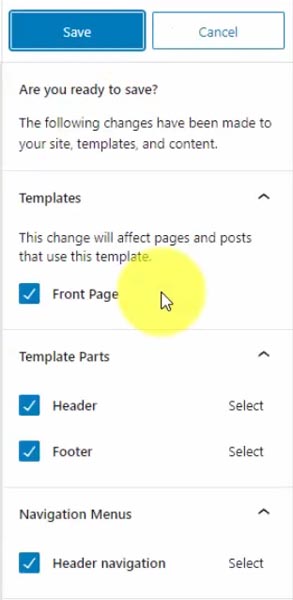
Let’s save these changes, and you’ll see how we’re updating all these various parts of the design, including our “Front Page” template, “Header” & “Footer” template parts, and our “Header navigation” menu.
The final step is to add our photo gallery to the homepage so the “Post Content” block within our “Front Page” template shows something!
We’ll go to the home page right now to add our gallery. Let’s jump back to our dashboard, go into the Pages menu, and click on the “Home” page, which should also indicate that it’s set as the “Front Page.”
Add a “Gallery” block, select your uploaded images or add new ones, and click Create a new gallery. Then edit the Block Spacing to 0, so the photos touch each other. You can also update where each image links to when clicked.
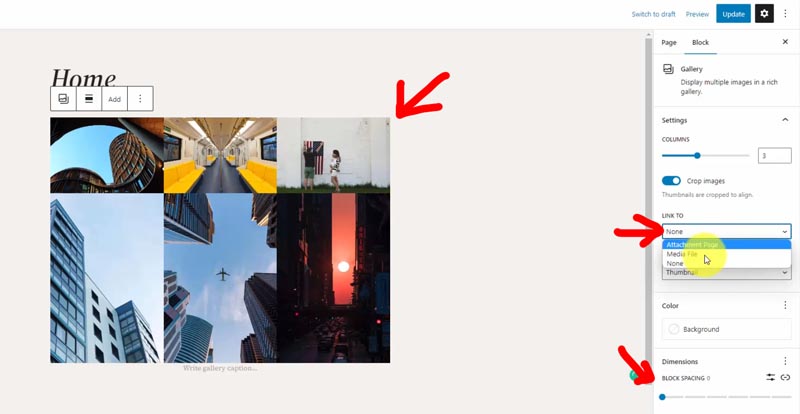
Update the page, and now we can view our finished home page with the custom template!

Edit the Page Template
Go back to Appearance > Editor > Browse all templates and select the “Page” template displaying our single pages. This template will go quicker than the Front Page since we’re only making minor updates.
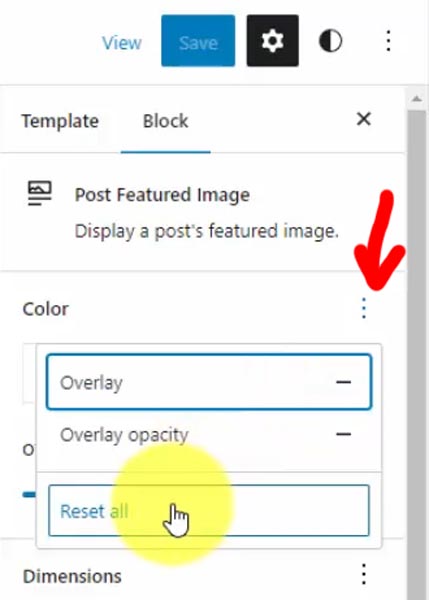
Click the “Post Featured Image” block, click the three-dot icon next to Color, then select “Reset all” to get rid of the black overlay.
From the editor window, select the Align option on the featured image and change to None (Max 650px width) since that’s the inner width of our post content.
Then, center the post title and remove the “Comments” block since we don’t want visitors commenting on pages.
That’s all we’re going to do, so let’s save and refresh our “About” page.
Contact Form 7
Our “Contact” page uses the “Page” template, and one thing you may want to add is a contact form.
Go to Plugins > Add New and search for “Contact Form 7.” I’ve used CF7 since I began with WordPress over a decade ago, and it’s still one of the most popular plugins on WordPress, with 5+ million active installations.
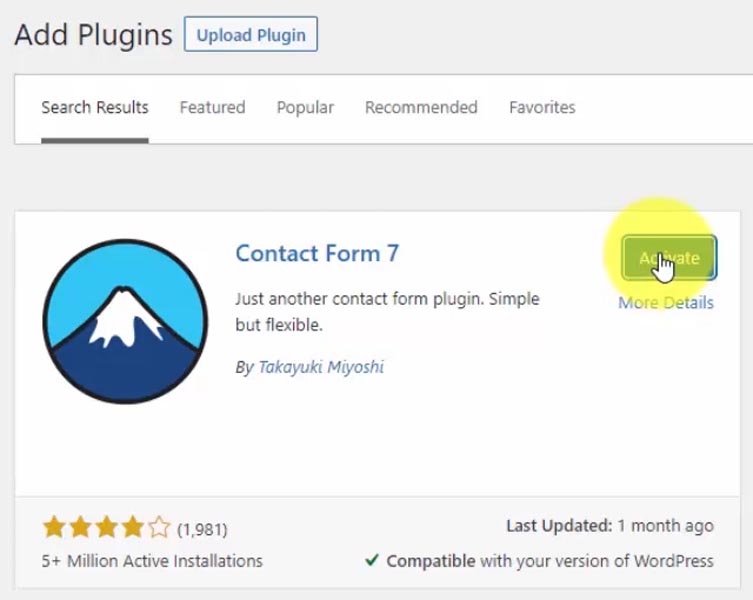
Install and activate Contact Form 7. That will add a new WordPress menu option, “Contact,” to the admin sidebar, with a pre-made form ready to go.
Insert your custom contact form through the shortcode, which you can copy/paste to a post, page, or template.
To edit, click on that form, and build your custom fields from the “Form” tab.
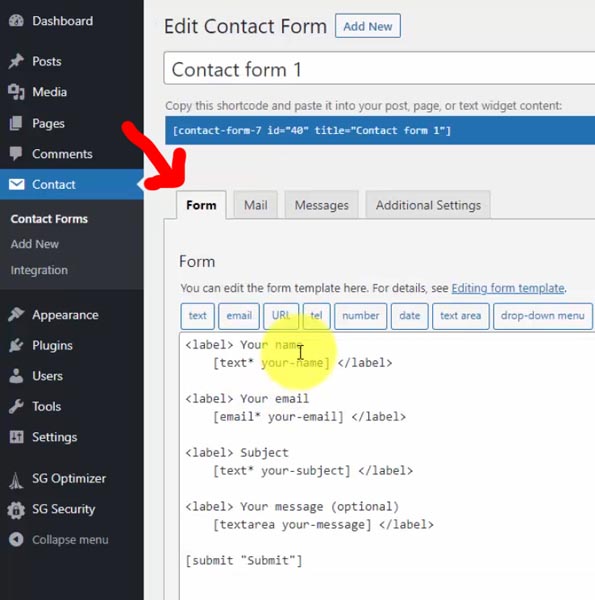
To create the form response, go to the “Mail” tab. You can send one email to yourself with the form details or a second email confirmation to the form user.
I’ll let you fuss with these settings. But, for now, let’s insert it into our contact page!
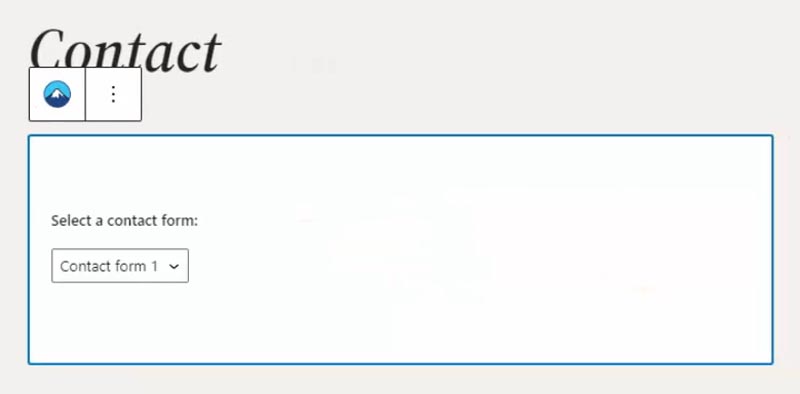
Go back to Pages > Contact and paste your shortcode or use the CF7 block with a drop-down menu to select, then publish.
Go ahead and test it out.
Edit the Home Template (Shows All Blog Posts)
The next template is the one that shows our blog posts — once again, confusingly called the “Home” template. For the most part, I like the look of this layout with featured images, but we’ll make a few minor changes.
We need to change the title to “Blog” and center it.
Within the blog post, center the title and set the margin to 1. You’ll see that it applies to all posts since they come from the “Query Loop” block. Then remove the “Post Excerpt” block since we don’t need it.
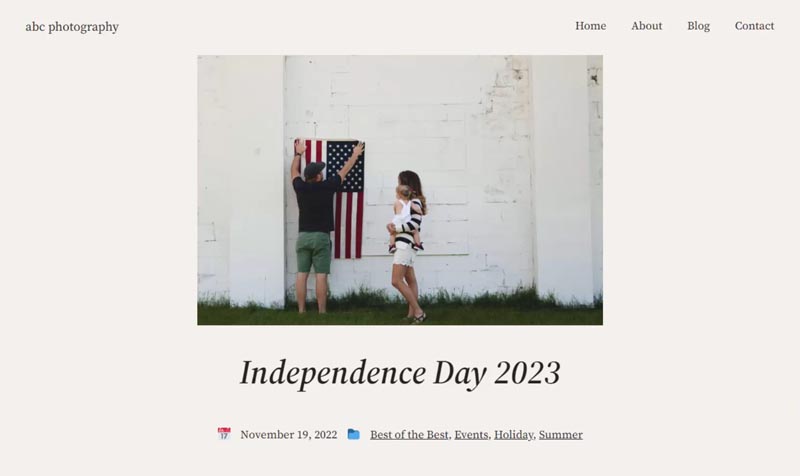
Jump into the list view now. I want to add a calendar emoji to the beginning of the date, so we’ll put the “Post Date” block into a new row. To do that, click the three-dot icon and “Insert before,” then search out the “Row” block. Drag-and-drop the post date into that row and add a new paragraph block to paste the emoji.
Select the row, set the justification to center, and set both the padding and block spacing to 1.
The final addition will be showing the blog categories. Add a new “Row” block after the date with center justification, and insert the “Categories” block within it. This block has the option to add a prefix and suffix, so we’ll paste in a folder emoji before the list of post categories.
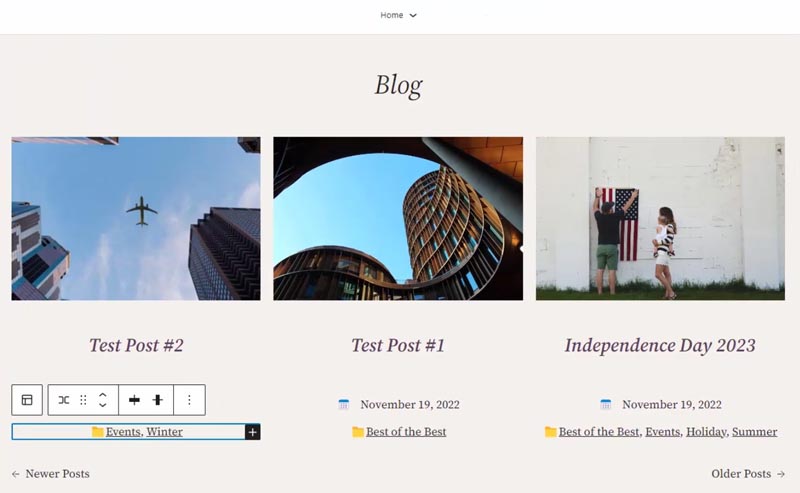
Look at the website, and the icons are different. I think that’s because WordPress has its method of rendering emojis.
Another weird observation is the bottom two-column section on the live website that doesn’t show on the editor.
However, if you go into the list view, there is a blank “Pattern” block. Removing it (along with the spacer below) should fix the problem.
Lastly, I’ll save this “Query Loop” block as a template part so you can use it within other templates (next section). Select the three-dot icon and click “Create template part,” then name this whatever you want — I went with “Query loop with Icons.”
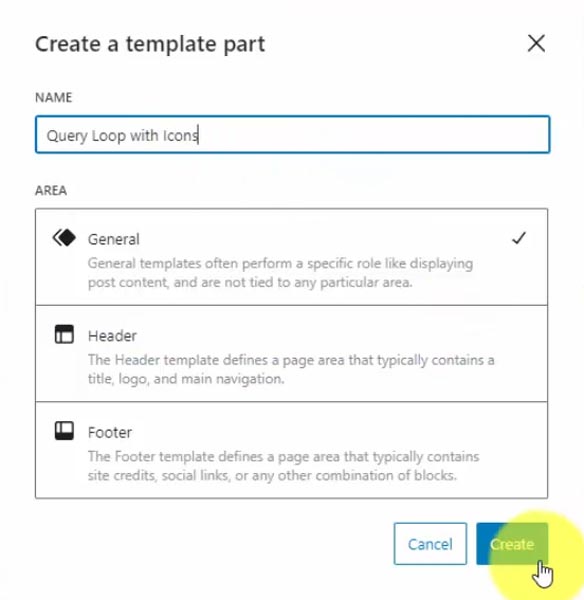
Oddly enough, when you create it, the alignment reverts to None (Max 650px), so reset it to Wide width (Max 1200px).
Edit the Archive Template
The “Archive” template displays the categories, tags, and other archives (which include your author links).
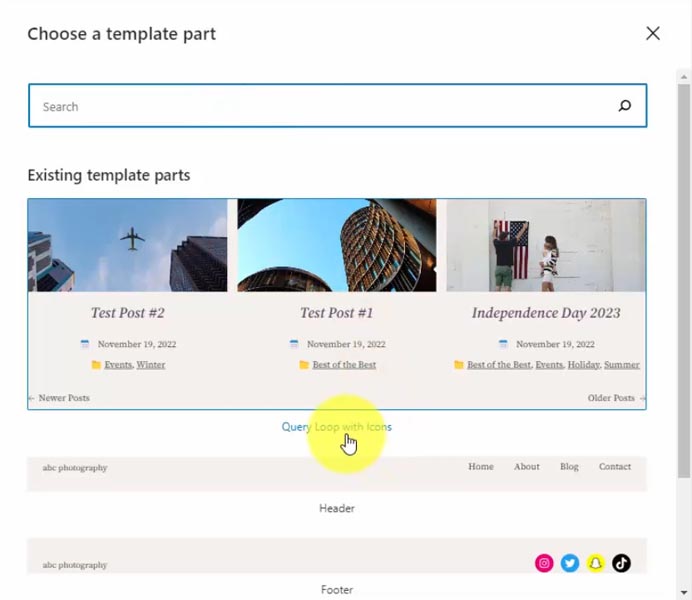
Center the title and replace the default “Query Loop” block with our custom template part. To add this, search for the “Template Part” block and choose the one we just created for the blog page.
Once again, we have to update this alignment to Wide width (Max 1200px)… must be another little bug. Remember, the software is never perfect!
Edit the Single Template (Shows Individual Posts)
We got one more template to go, and that’s the “Single” template which is for individual blog posts.
We’ll start with the same changes we made on the Page template.
First, reset the “Post Featured Image” block color settings, make the alignment “None (Max 650px),” and then center the post title.
The categories and tags are under the post content, but I want to move them to the top and make it look similar to our Home Template (a.k.a. Blog posts page).
Jump into the list view to drag-and-drop the “Post Meta” block under the title, then expand this block to see how it’s organized. Delete the spacer and separator, and then you’re left with a “Group” block that has two columns with rows and a stack.
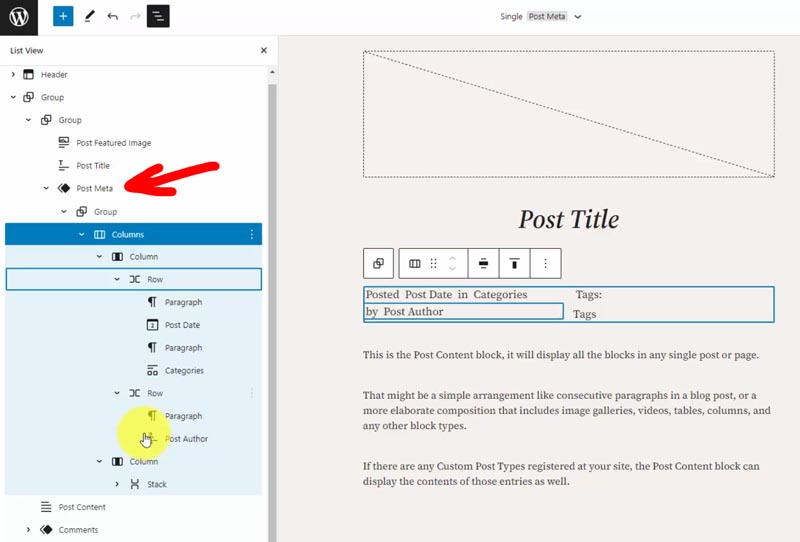
We won’t be showing the tags, so it’s unnecessarily complicated.
We’ll simplify all this by only keeping the row that contains the “Post Date” and “Categories” block by drag-and-dropping this to the first level under the “Post Meta” block. Now you can delete the “Group” block.
Make your row center justified center, change the first paragraph to the calendar emoji and the second paragraph to the folder emoji, then set the block spacing and padding to 1.
Congratulations, we’re done, and you have a custom WordPress website design that you can edit/tweak in the future!
Get the one-page tutorial guide if you want to recreate what we went through today.
Twenty Twenty-Three Tutorial Guide & Assets
Want this helpful free giveaway or training?
The Future of WordPress Full-Site Editing
Even though this is a photography portfolio example, think about how you can apply this template customization to any website.
As you learned throughout this WordPress tutorial, full site editing unlocks a lot of capabilities. However, recognize that it’s still in its infancy, which comes with a few bugs and limitations.
I’m sure they’ll continue to add features as new WordPress versions are released.
While I love the step towards complete visual design control with zero code, I still prefer a more powerful drag-and-drop theme for professional use — Divi by Elegant Themes.
Divi solved the WordPress full site editing problem years ago, and they have more features than what WordPress currently offers in their core software.
I recently switched over most client and personal websites (including this one) to Divi.
Check them out below, or watch me build a professional website with Divi from scratch!
Divi by Elegant Themes — The #1 Most Popular WordPress Theme

Divi Visual Builder
The #1 WordPress theme on the entire internet to design your website with drag-and-drop!
Buy NowI may earn a commission if you purchase using my links which helps support this website.