
We are going to create the website you want step-by-step with WordPress and Divi by Elegant Themes.
Divi is one of the most popular website drag-and-drop builders on WordPress these days. The platform allows novices to create desktop and mobile-friendly layouts, with the full ability to customize without knowing any code!

Divi Visual Builder
The #1 WordPress theme on the entire internet to design your website with drag-and-drop!
Buy NowI may earn a commission if you purchase using my links which helps support this website.
Divi is an all-around great option to create your first website, and I want to show you step-by-step on how to build a business website with WordPress + Divi visual builder.
By the end of this tutorial, it’s going to be much easier for you to create an elegant website regardless of whether you have any previous experience with web design or coding.
Finish at Your Own Pace
Get this tutorial sent to your inbox with more WordPress basics.
Let’s begin!
Setup Domain & Web Hosting

Launch with HostGator
Setup WordPress in minutes! 👇
Start NowI may earn a commission if you purchase using my links which helps support this website.
HostGator is an excellent platform for beginners to set up your website with a custom domain and web hosting. I’ve been a HostGator customer for almost a decade, and have partnered with them to give you a special 45% discount off your first year (click here to automatically apply)!

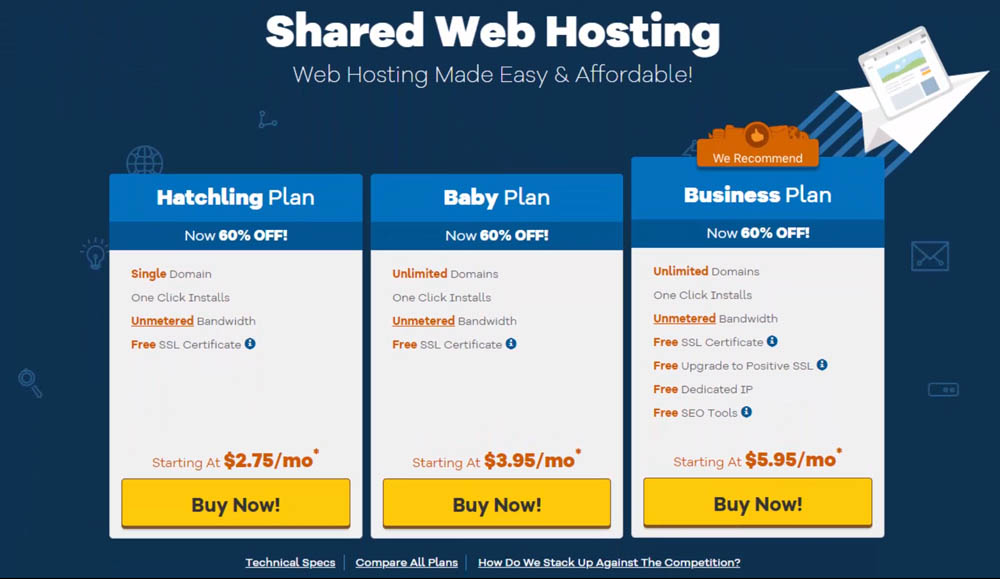
On the HostGator homepage, select “Get Started” to view the plan breakdown. You can also select the “Web Hosting” navigation menu item to reach the same page.
Select the Hatchling Plan if you are a beginner who only needs 1 domain/website.
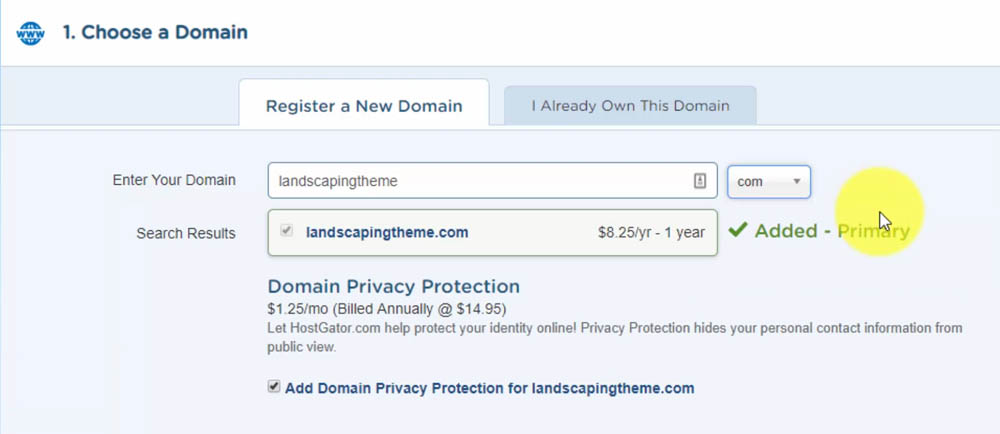
Select your domain name to check availability.
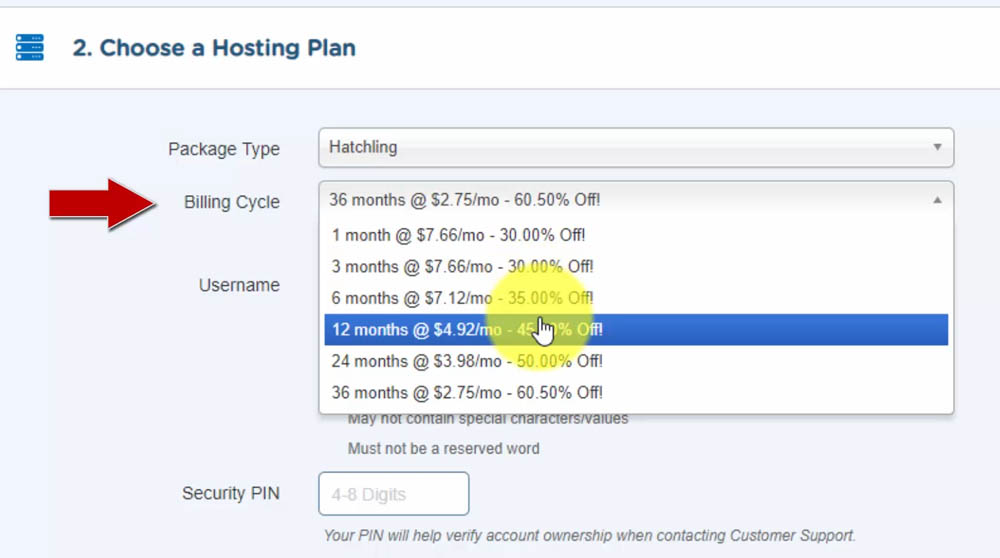
Select the longest term you can afford to get the best deal for the Hatchling plan. I recommend a 12-month billing cycle to get the right mix of affordability while also giving yourself enough time to build your website the right way.
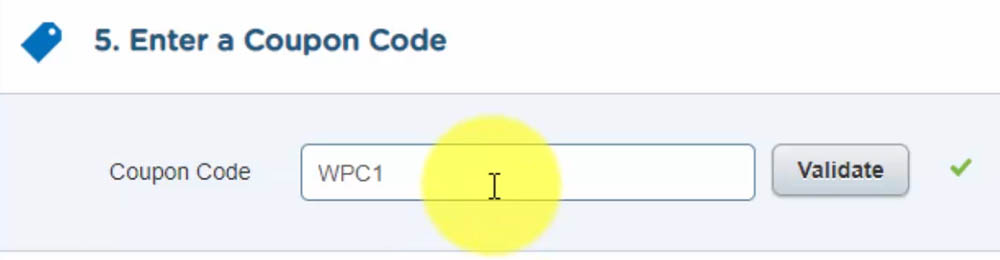
Use coupon code WPC1 at checkout to unlock your 45% discount.
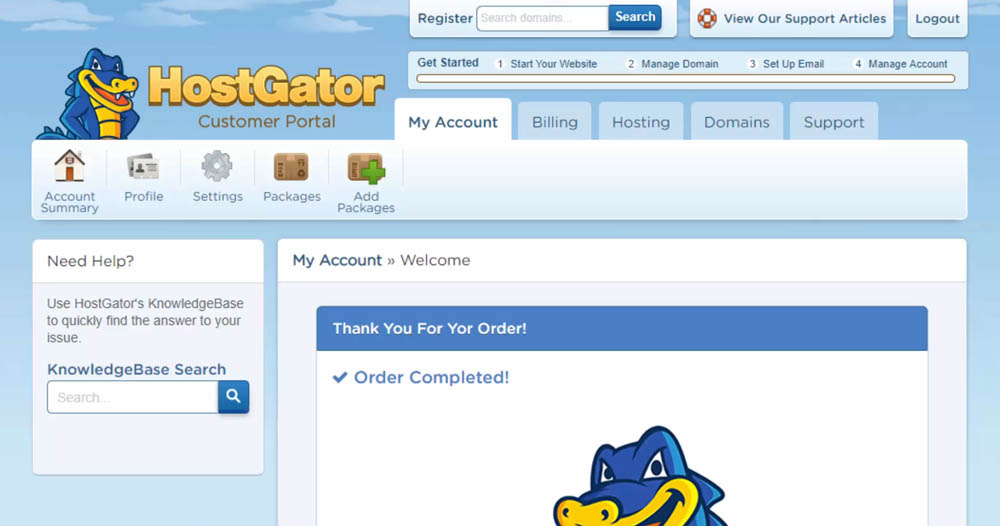
After checkout, you will redirect to your HostGator Customer Portal and receive login information via email for both your Customer Portal and your hosting control panel.
The customer portal is for managing your billing, the control panel is for building/development.
Open up the email titled “Your Account Info” and click on the “Your Control Panel” Link.
** NOTE: It may take up to 24-hrs for your control panel account to work!
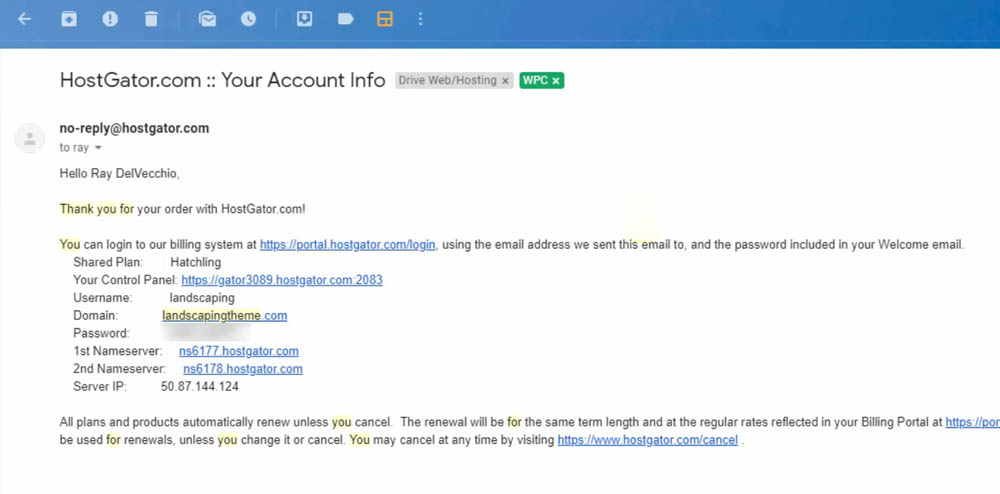
Copy and paste your login info into the fields.

Install WordPress
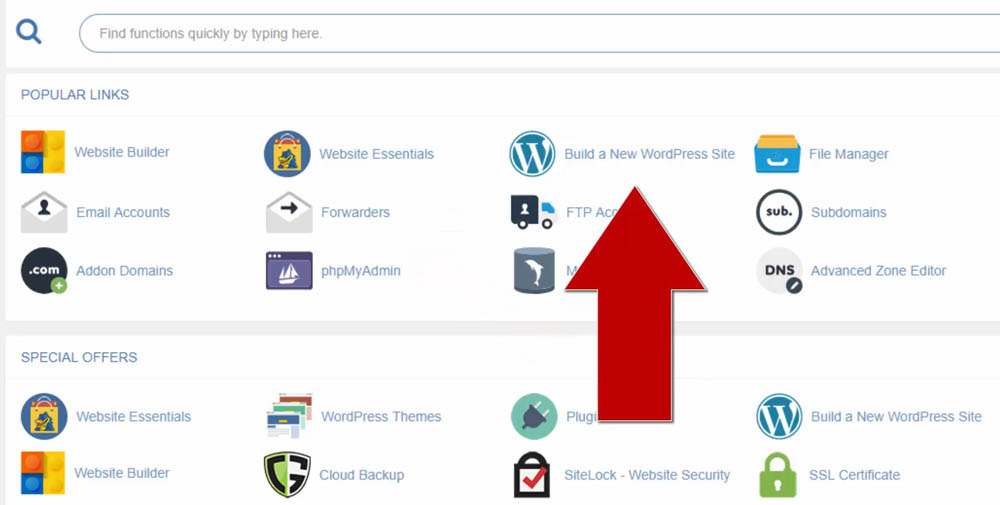
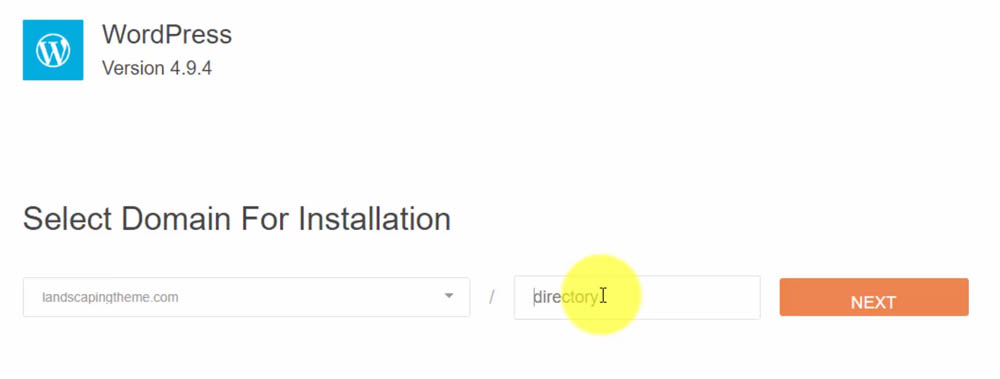
Once in your control panel (cPanel), click on “Build a New WordPress Site” from the “Software and Services” menu to install WordPress in seconds.
Choose your domain from the drop-down menu to install WordPress directly on the root path (no sub-directory) then click “Next.”
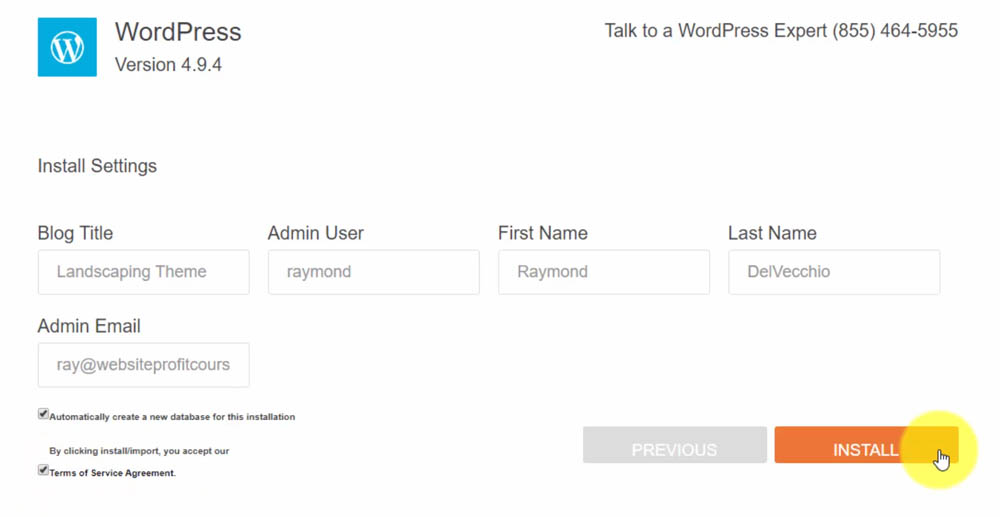
Create your WordPress administrator account by choosing your blog name, username, first/last name, and email address.
Check the box that says “Automatically create a new database for this installation” then click the Install button.
HostGator will install WordPress and generate a secure password that you can use to login to your new WordPress website.
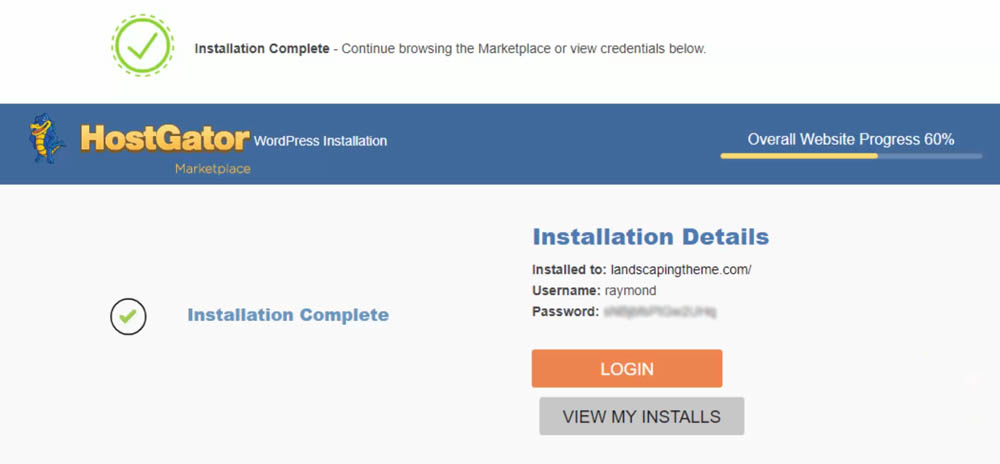
Click “Login” or alternatively, you can use the following URL structure to access the WordPress login page anytime:
https://yourdomain.com/wp-admin
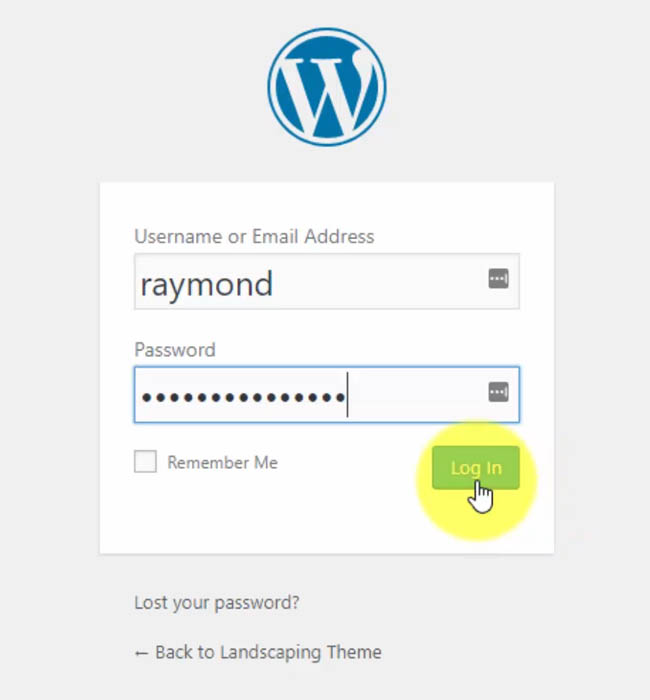
Log into your WordPress Dashboard with the provided username & password.
Delete Plugins
WordPress often comes with pre-installed plugins. We will start our design by deleting all of them and only add back those which are essential.
Click “Plugins > Installed Plugins.” You must deactivate before you can delete.
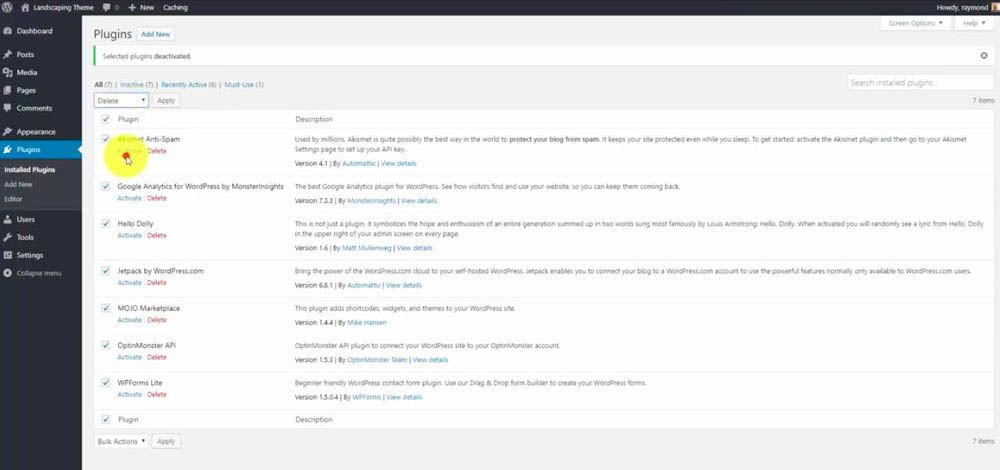
Select all then click on “Bulk Actions.” In the drop-down menu select “Deactivate” then Apply to save your settings.
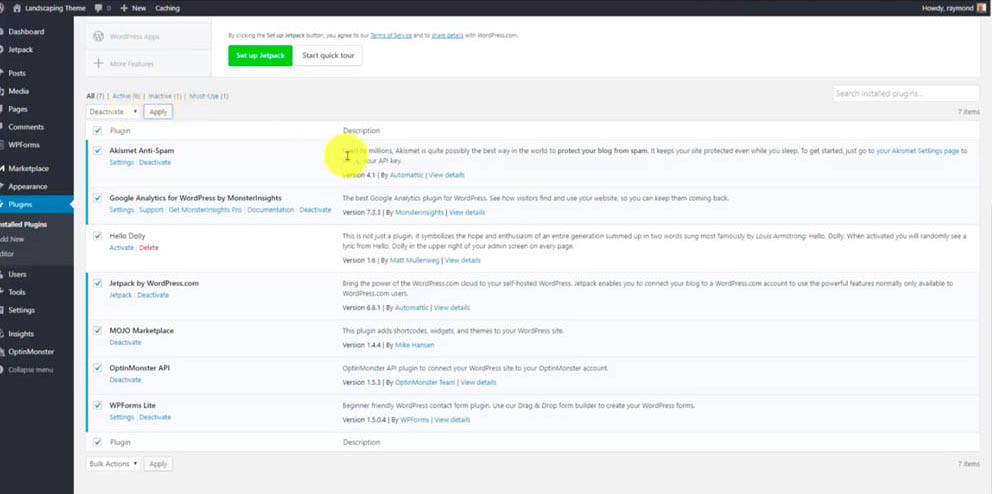
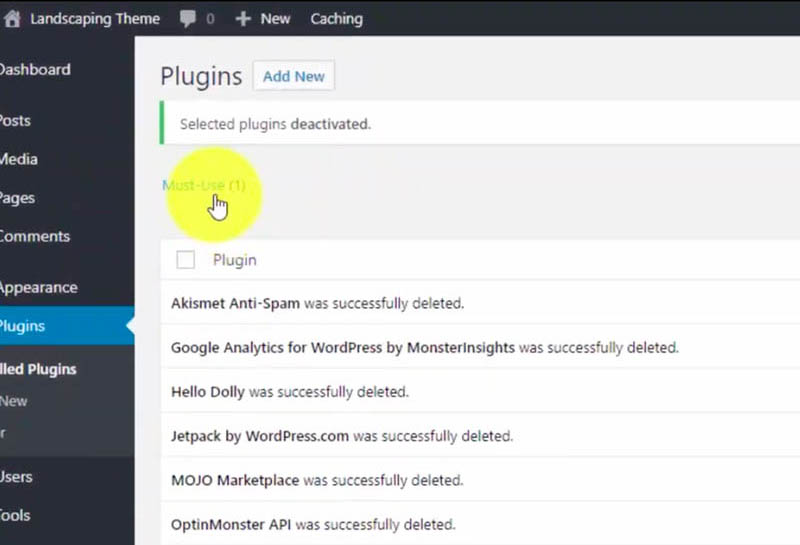
Once the plugins are deactivated, select them all again. From the bulk actions drop-down menu select “Delete” then Apply.
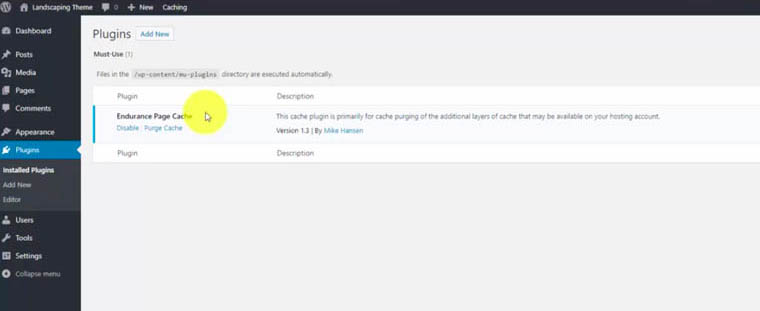
Endurance Page Cache “Must-Use”
Once you delete all the plugins, there will be a remaining plugin called Endurance Page Cache. Click the “Must-use” link on the plugins page to reveal.
This plugin is added by HostGator to help save bandwidth, which is normally good for both you and them to achieve a faster website.
The problem is when you are designing your website it may prevent updates from showing on the front-end. This is because “caching” stores versions of your website pages instead of loading everything from the database in real-time each time a user visits.
First, we must turn off Endurance Page Cache to ensure this doesn’t occur before we delete it!
On the plugins page, click the “Purge Cache” button.
Then go to the sidebar and select “Settings > General.”
Scroll down to the bottom of the page to the Endurance Cache section, and set the “Cache Level” to “Off (Level 0)”, then Save.

Delete Endurance Page Cache via FTP
Once you turn off and purge the cache, you will need to delete the plugin via a File Transfer Protocol (FTP) program.
An FTP program gives you access to the raw files on your web server. Download my favorite FTP program, FileZilla client for Windows & Mac, and use your control panel user/pass to add your account to FileZilla Site Manager.
When you log in with your HostGator control panel account, you’ll notice the left pane is your PC, and the right pane is the web server. You can easily transfer between the two using FTP.
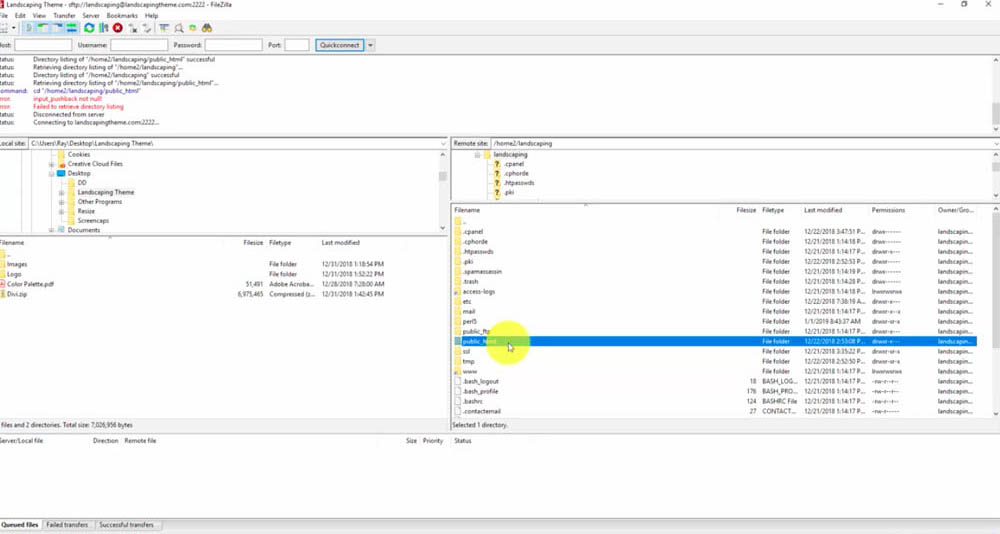
On the web server side (right panel), navigate to “public_html > wp-content > mu-plugins.”
Delete the Endurance Page Cache plugin (one PHP file), then refresh your WP plugins page in the browser. You will notice the plugin is now gone.
Install Plugins
Now we have a clean slate to build our website. On the plugins page, let’s install two essential plugins you will need to start:
Child Theme Configurator
Child Theme Configurator allows you to create a “child theme” for Divi. Child themes ensure any customizations you make to your website will not be lost when you update the parent theme (Divi).
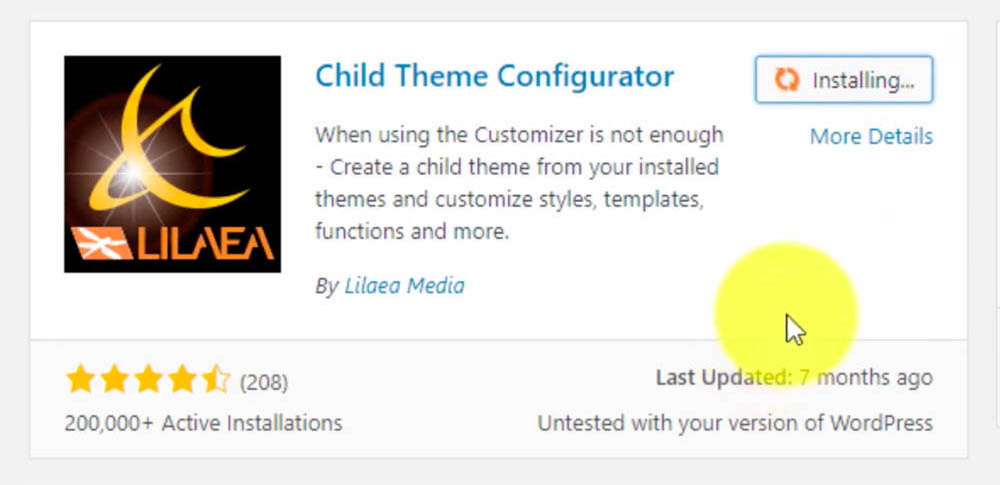
Click Install and then Activate.
Really Simple SSL
Really Simple SSL redirects any non-HTTPS website requests to the secure version. Nowadays, almost all website hosts (including HostGator) offer free SSL certificates which give you the ability to use HTTPS.
Unless you purchase SSL separately, your hosting account should be ready to operate with HTTPS without any setup on your end.

Create Pages
After you install your plugins, the next step is to set up the basic pages you will need for a successful site.
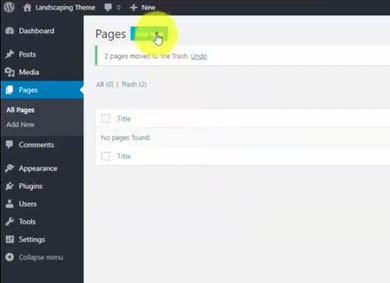
When you open, you will see that WordPress comes with some existing pages. Delete the existing pages by “Select All > Bulk Actions > Move to Trash.”
Home
By default, WordPress displays blog posts on the home page.
For a business site, you want a dedicated home page separate from your blog.
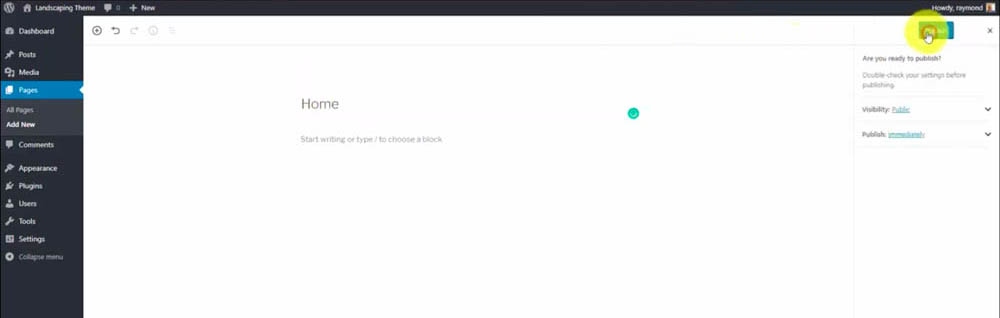
Go to “Pages > Add New.”
You will see the new Gutenberg Editor layout. You will NOT be using the Gutenberg Editor (you will instead be using the Divi visual builder), so all you need to do is add the titles of the pages to create the URLs.
Create a new page with the title “Home” and then click the “Publish” button.
Repeat this process to create the following pages just like you did the home page:
Blog

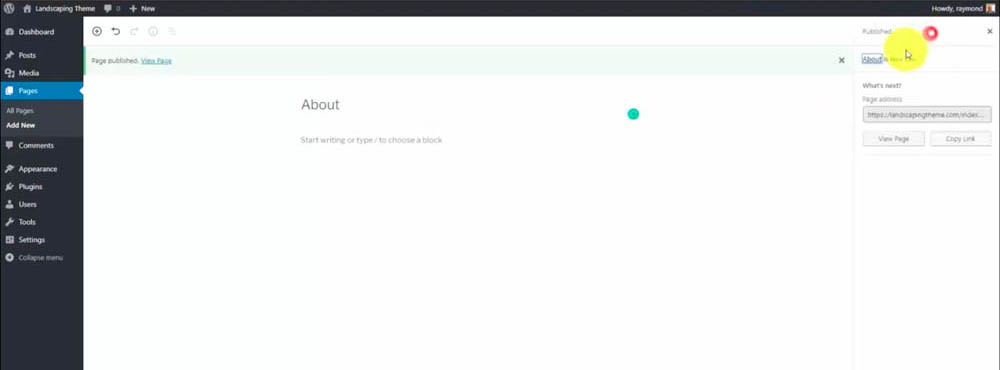
About
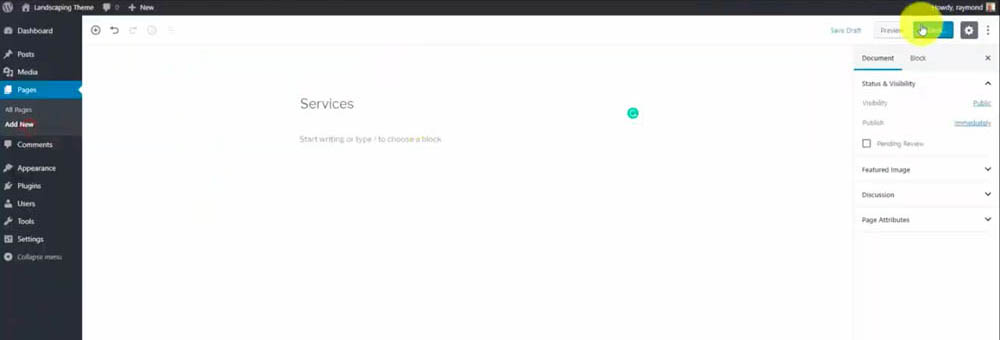
Services
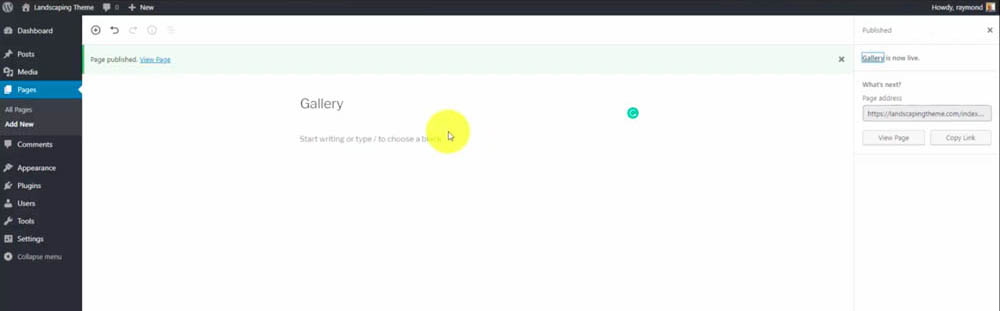
Gallery
WordPress Settings
After creating your pages, you will adjust some of the settings of your website.
Go to “Settings > General” if you want to update your website title and tagline (optional).
Reading
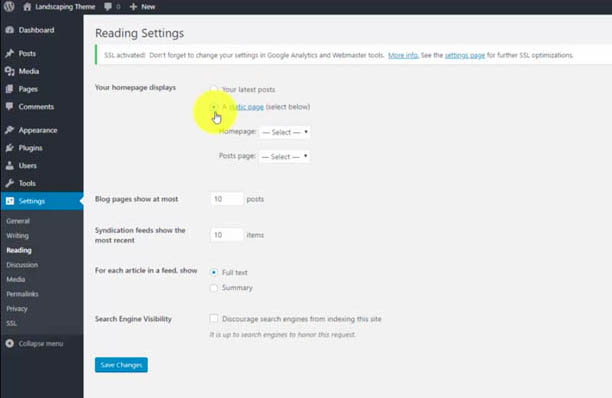
Under the “Settings > Reading” tab, go to “Your homepage displays” and change to “A static page.”
Then select the “Home” page we just created from the “Homepage” drop-down menu and select the “Blog” page from the “Posts page” drop-down menu.
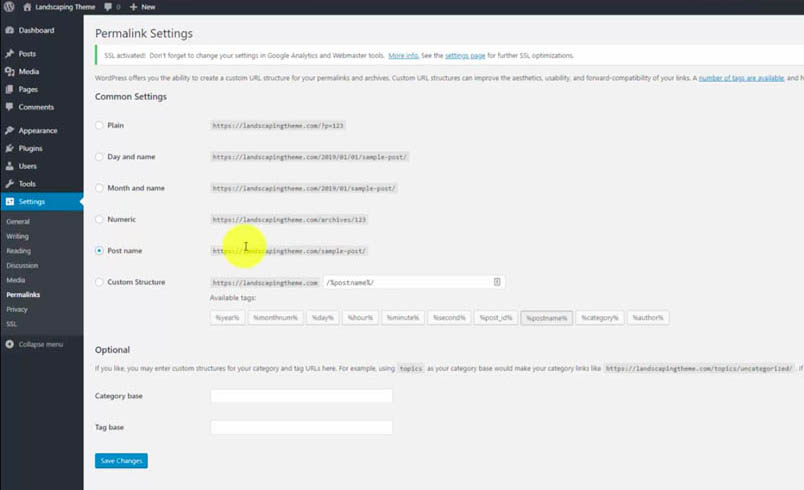
Permalinks
Under the “Settings > Permalinks” tab change the URL settings to “Post Name” to make your URL structure simple and clean.
Install Divi
You are now ready to install Divi!
Download the ZIP file after you purchase Divi. Buy Divi today from the Elegant Themes website.
Divi Visual Builder
The #1 WordPress theme on the entire internet to design your website with drag-and-drop!
Buy NowI may earn a commission if you purchase using my links which helps support this website.
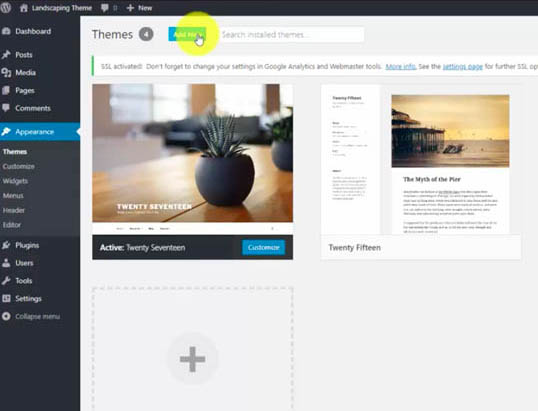
Go to “Appearances > Themes” then click “Add New”. From here you can upload the theme ZIP file.
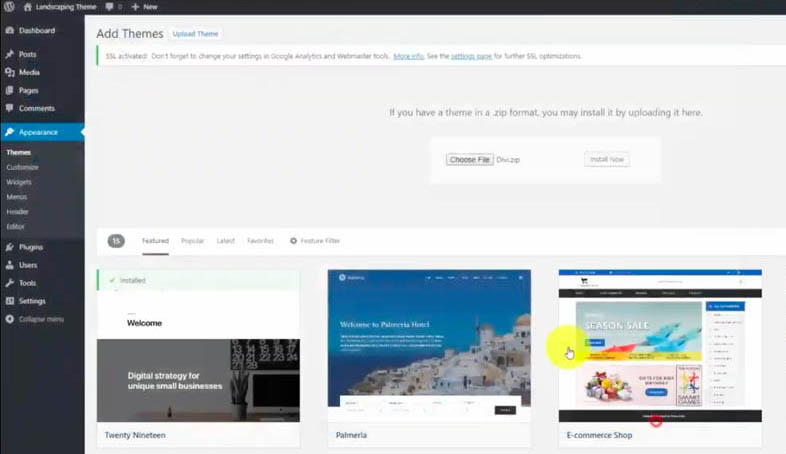
Select “Choose File” and then click the “Install Now” button.
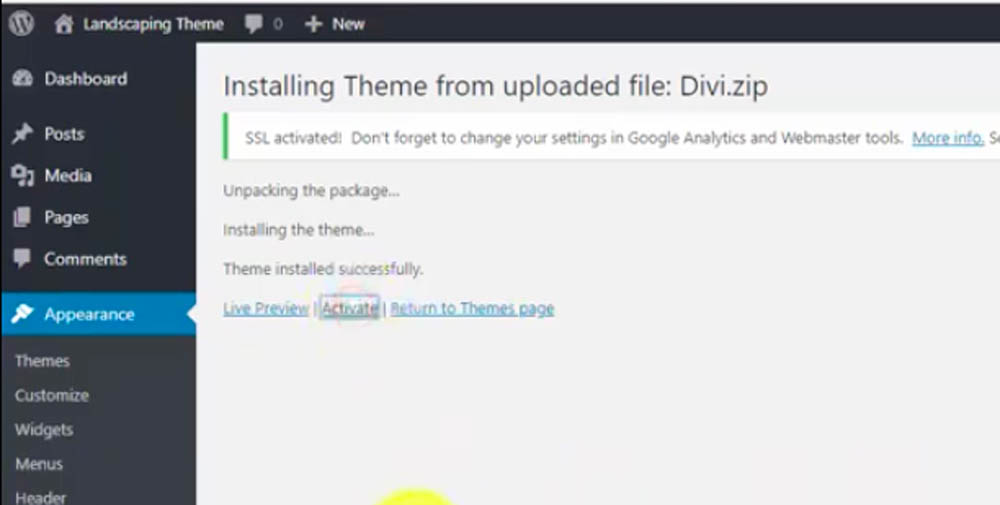
Once successfully installed, click the “Activate” button.
NOTE: If you already have Divi, you need v3.18+ to work with WordPress 5.0 & Gutenberg.
Create a Child Theme
After Divi is successfully installed into WordPress, create a Divi child theme in order to keep your customizations safe when you update Divi in the future.
Child Theme Configurator Wizard
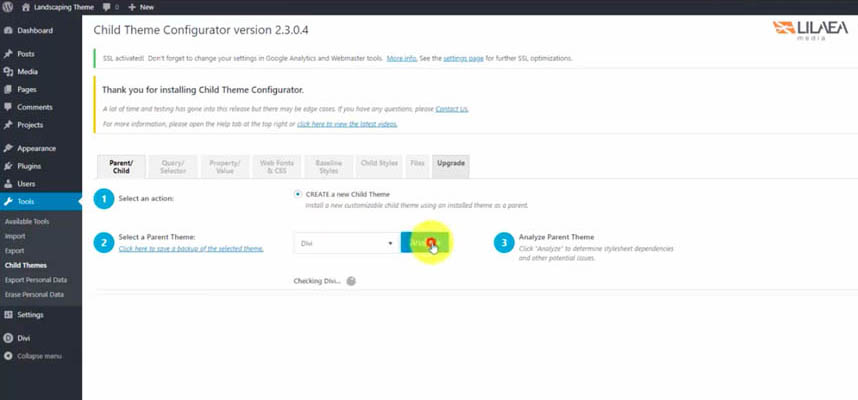
Go to the “Tools > Child Themes” page. From here you can create your first child theme using a step-by-step wizard.

For Step #2 “Select a Parent Theme” pick “Divi” from the drop-down menu.
Click the “Analyze” button to make sure everything passes the test.
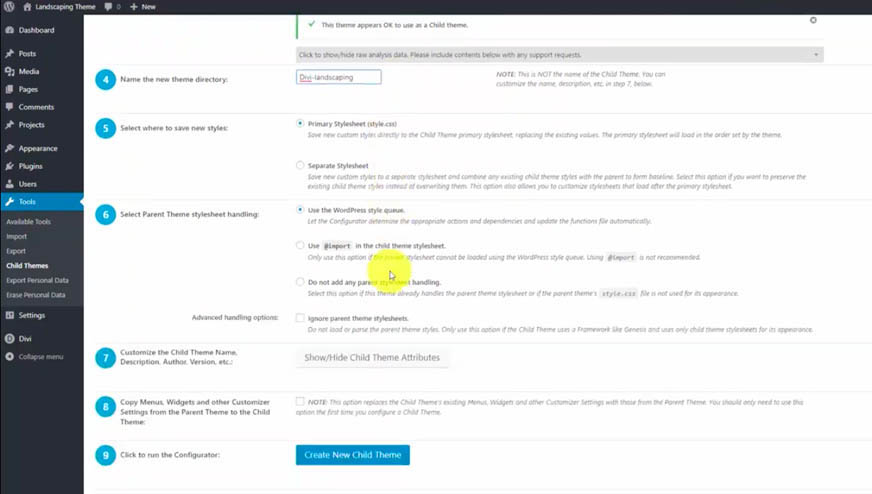
You can optionally rename the new child theme directory within Step #4 (I went with Divi-landscaping), then leave the remaining options at their default values and click “Create New Child Theme.”
Activate Child Theme
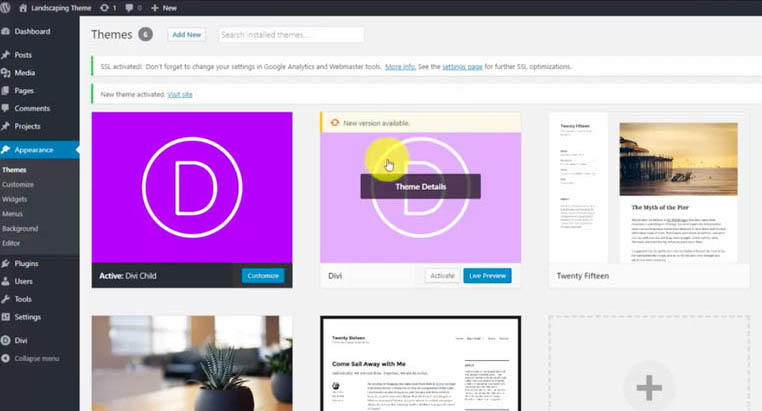
Navigate back to “Appearance > Themes” and click the “Activate” button for your newly created child theme to switch from the Divi parent theme.
Create Main Navigation Menu
Next, set up your basic navigation bar for your website.
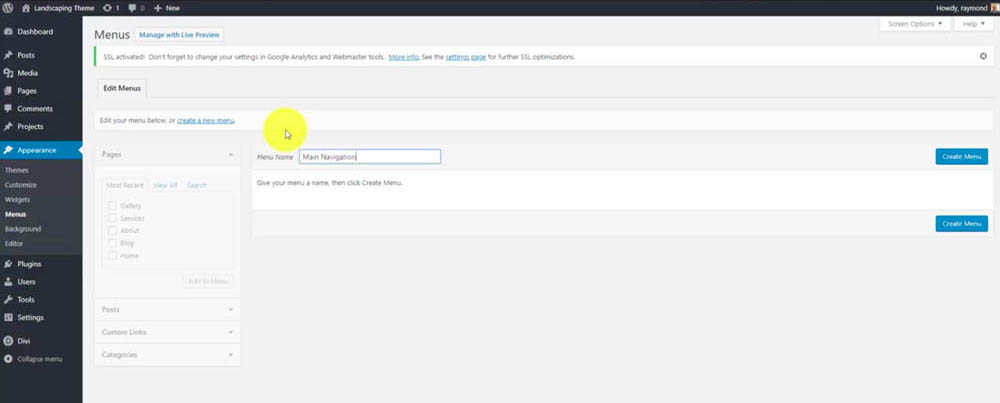
Go to “Appearance > Menu”, name your menu “Main Navigation” and click the “Create Menu” button.
Manually select the pages you would like to be on your menu. In “Menu Structure”, you can drag and drop to put the menu in the order you would like, along with indent to create sub-menus.
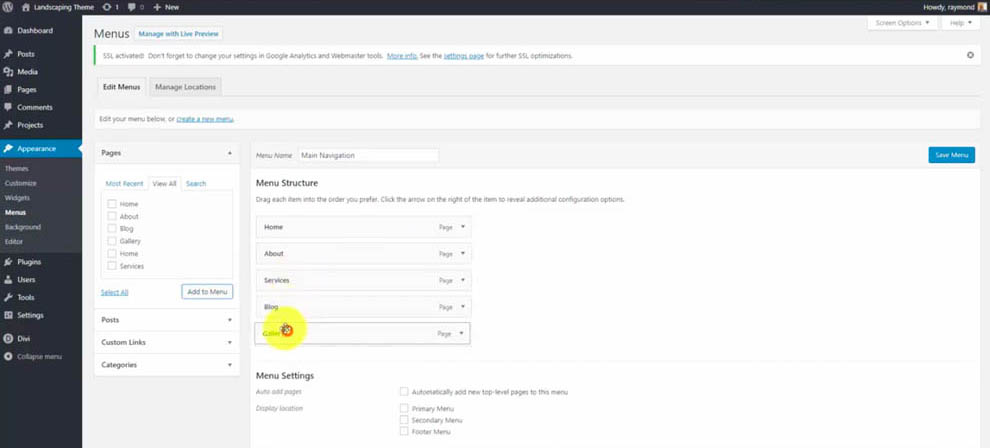
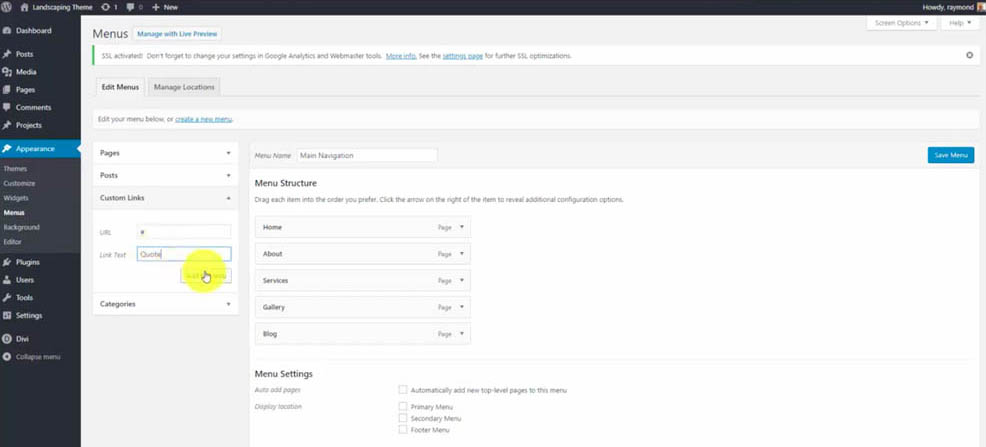
Create a custom link which will be an on-page link to the contact form. For now, just put a place holder “#” in the URL and “Quote” in the link text.
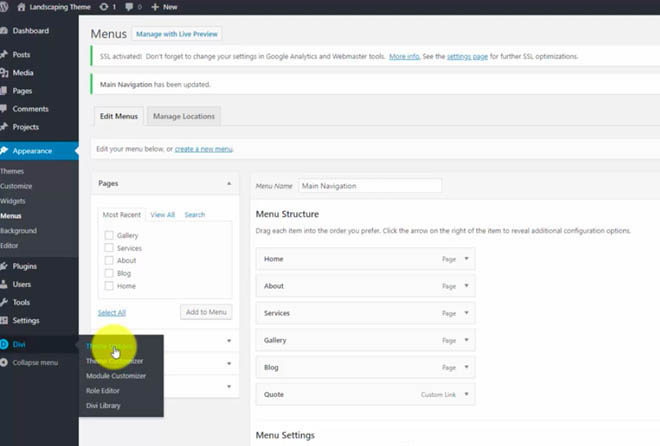
In menu settings, if you automatically would like to add pages to the menu when you create them, select the checkbox “Automatically add new top-level pages to this menu.”
Then under “Display location”, select “Primary menu” which will attach this menu to your main navigation bar.
When you are done, click the “Save Menu” button.
Update Your Divi Settings
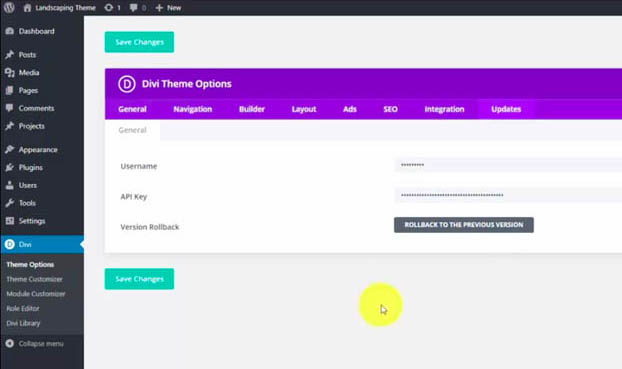
Update your Divi Settings to reflect your website’s brand. Go to the sidebar “Divi > Theme Options” section.
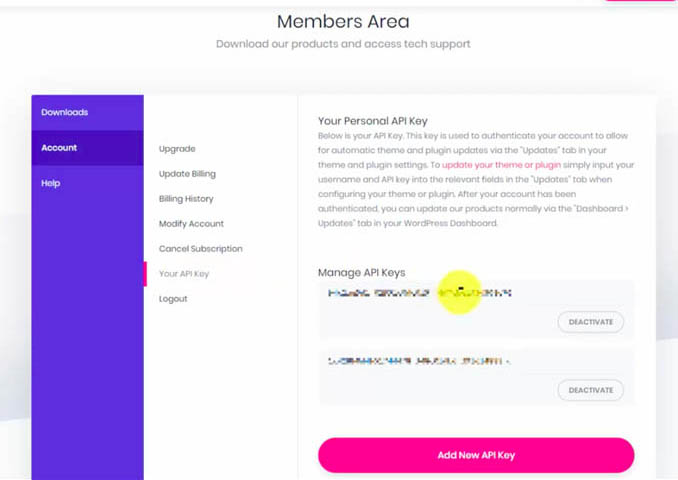
Add Your API Key
Before you change any of your theme options, you want to make sure you are receiving all updates from Elegant Themes.
To do this, you’ll need an API key from your paid account. Go to the “Updates” tab and copy/paste in your API Key from your Elegant Themes members area as shown below.
You’re now ready to start customizing and designing your Divi website!
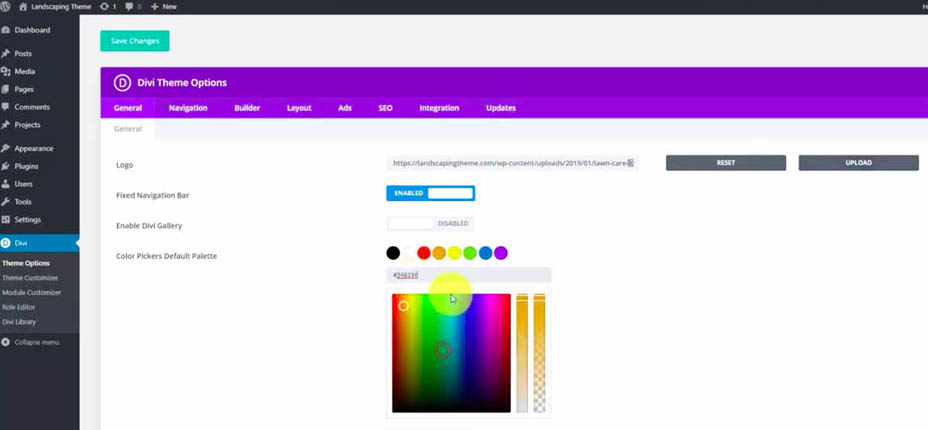
Change Your Logo
If you have an image logo for your site, upload it within the Divi Theme Options page.
Change Your Color Palette
Divi allows you to set a default color palette, that way when you are customizing any parts of your website you don’t have to enter in hex codes or do it on the fly.
To change your color palette click on the colors and enter in your color hex codes.
Activate Your Social Media Icons
Activate the social media icons you would like displayed on your site by “enabling” or “disable” the social media sliders.
Customize Your Divi Theme
To begin customizing your website go to “Divi >Theme Customizer.”
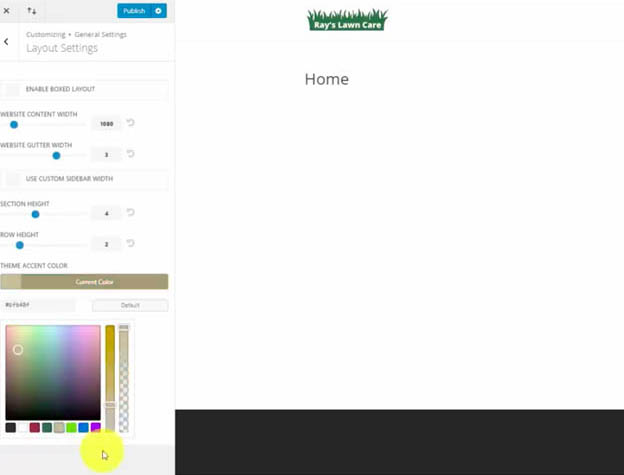
General Settings
To set your default values for color, spacing, and fonts go to “General settings > Layout Settings.”
Layout Settings
Click “General Settings > Layout Settings” and set the Theme Accent Color to tan from our custom color palette.
Typography
In typography, you can change the style of fonts, sizes, boldness, line heights, and link color. We will adjust the line height and link color here.
Click “General Settings > Typography” and adjust your Header Line Height to 1.5 to give your header text plenty of room when it flows to a second line.
Change your Body Link Color to dark red from your custom color palette.
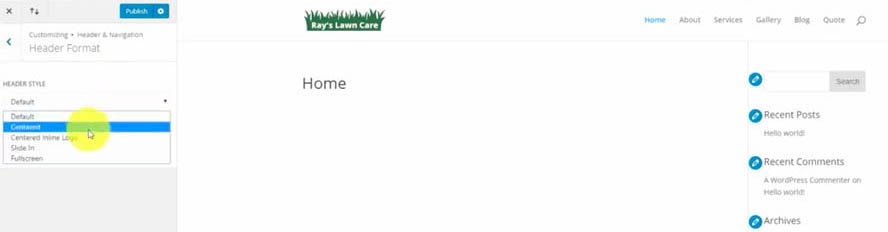
Header & Navigation
In the header and navigation tab, you can adjust the alignment, font, colors, and elements at the top of the website.
Click “Header & Navigation > Header Format”.
Header Format
The header format can be centered, centered in-line, slide, in or full screen.
Adjust your header format to be “Centered.”
Primary Menu Bar
In the primary menu, you can adjust the style of your main menu including text size, height, fonts, and color. We will change the font and color.
Click “Header & Navigation > Primary Menu Bar” and change the Font Style to Uppercase by clicking the block.
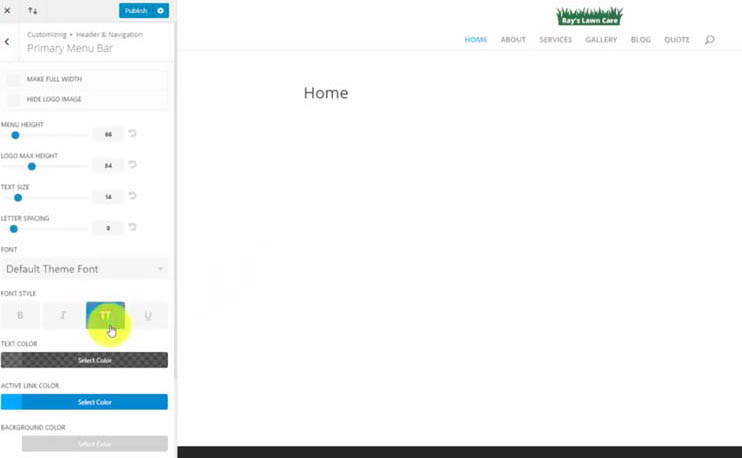
Then set the Active Link Color to dark red from our custom color palette.
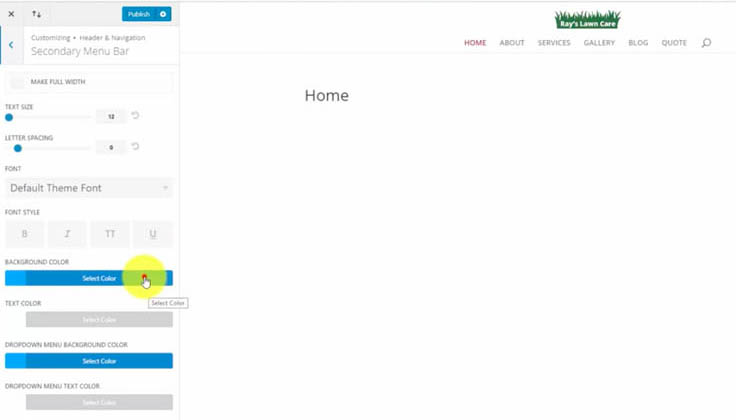
Secondary Menu Bar
A second menu will appear above your logo to display contact information. We will adjust the background color of your secondary menu.
Click “Header & Navigation > Secondary Menu Bar” and change the Background Color to black from our custom color palette.
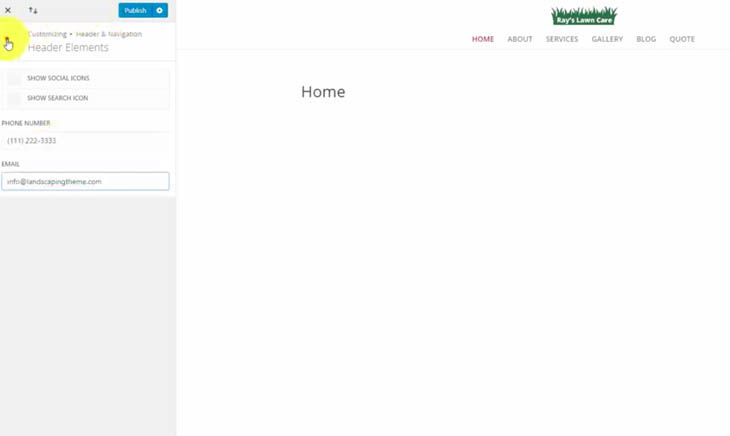
Header Elements
Next, we need to add your business contact info to show on the secondary menu.
Click “Header & Navigation > Header Elements” and add in the phone number and email you would like displayed on your site.
You can also deselect the Show Search Icon option if you don’t have a content-oriented website. I do not provide a search bar for most small business websites since it’s unnecessary.
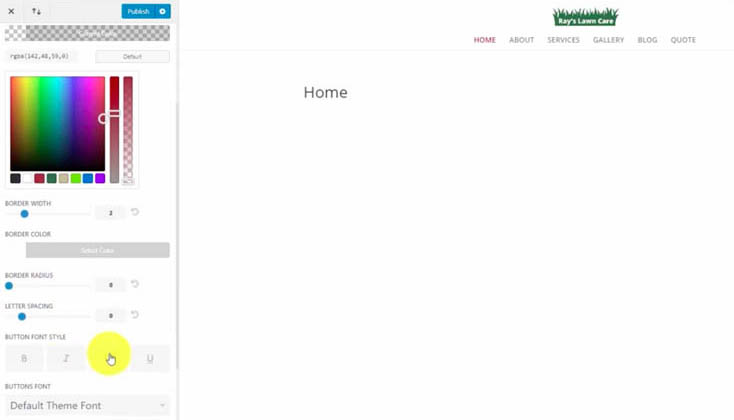
Buttons
In the buttons menu, you can set your default style for buttons such as their color, size, shape, hover effects, and text. We are going to change the font type and size, button color, and border.
Go to “Buttons > Buttons Style”.
Buttons Style
Adjust the Text Size with the slider at the top to 24px.
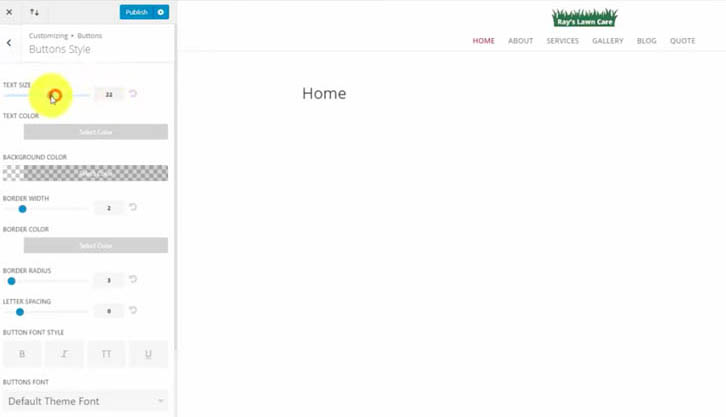
In the same menu, you can change the button color to an accent color in your palette. Select Background Color to change. In our case, we will select our dark red.
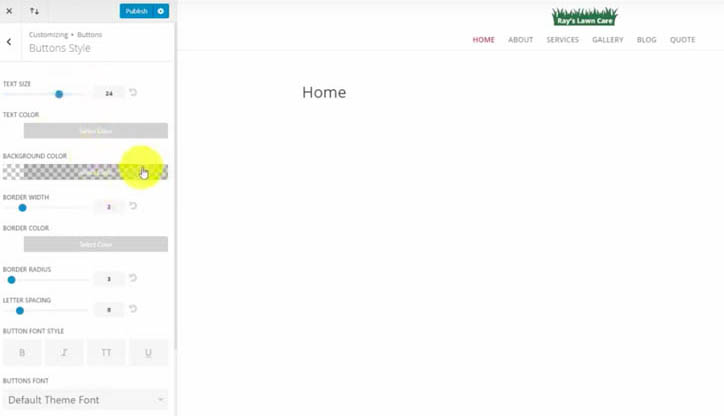
Button Border & Radius
Change the Border Radius of the buttons. To keep the buttons square slide the slider down to 0.
Just below the border-radius slider, you can change the Button Font Style to uppercase to match the menu and contract regular paragraph text.
When you have completed customizing, click the “Publish” button.
Build Homepage Layout
With our default values now set, we can begin building our page layouts using the Divi visual builder.
Navigate to the WordPress Pages, hover over the “Home – Front Page” and click the “Edit With Divi” link to launch the Divi builder.
For these updates, I’ll share the settings used within the video tutorial.
Call-to-Action (CTA) Image Banner
Add a new Section with 1-row and 1-column, and include a Text Module for the headline, a Text Module for the description, and a Button Module for our “Free Quote” CTA.
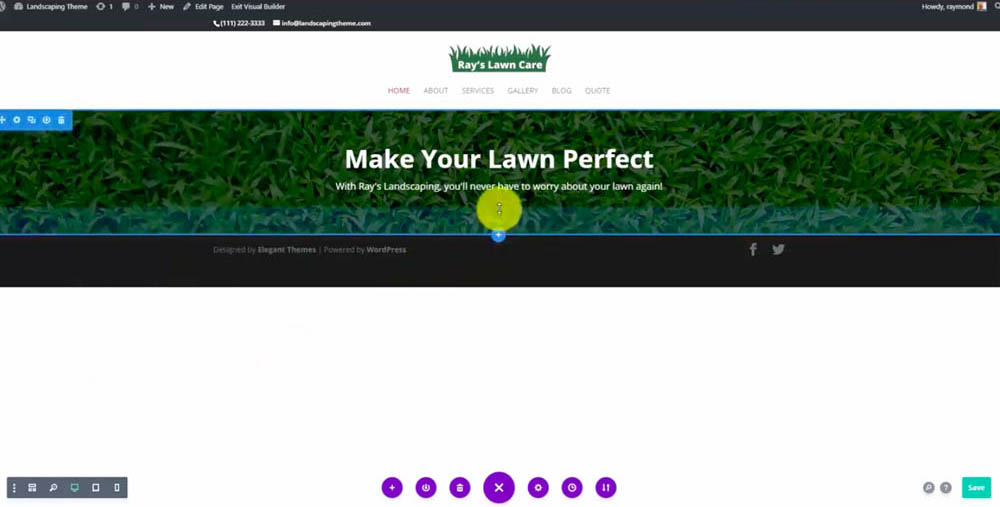
NOTE: Be sure to click the green checkmark and “Save” button frequently to ensure you don’t lose your progress!
Section Settings
- Background Color – Black
- Background Image – Grass Closeup
- Background Image Blend – Overlay
- Padding Top – 30px
- Padding Bottom – 50px
- Bottom Divider
Text Module – Headline
- Text Orientation – Center
- Text Color – Light
- Font Weight – Bold
- Font Size – 48px
- Line Height – 1.2em
Text Module – Description
- Font Weight – Normal
- Font Size – 18px
- Line Height – 1.7em
Button Module – Free Quote
- Enable “Use Custom Styles for Button”
- Font Color – White
- Background Color – Red
- Button Border Width – 0
- Hover Icon – Check Mark
- Link – Contact Form ID
Our Services Widgets
Add a new Section with 1-row and 3-columns (equally spaced), and include three Blurb Modules. Create the first Blurb, customize, and then duplicate for the remaining two columns.
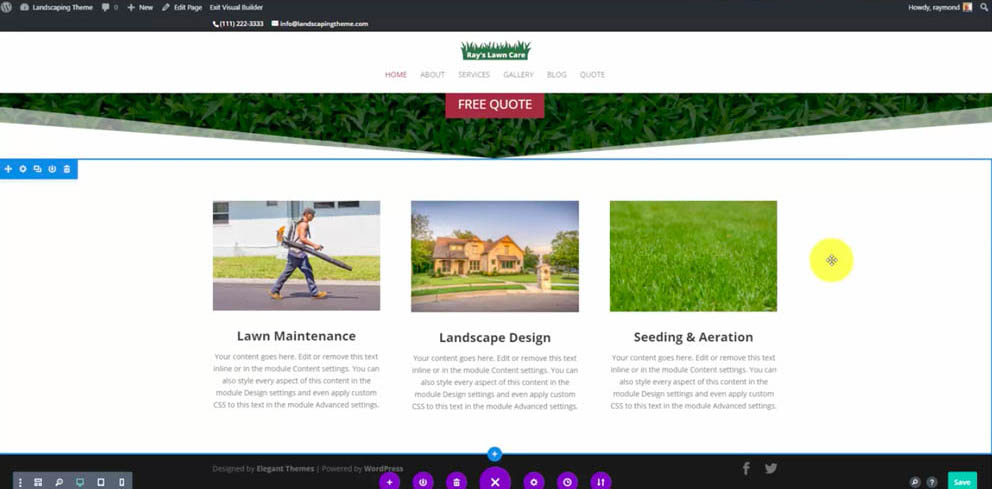
Section Settings
- Three-Columns
- Background – White
Blurb Module – Image
- Upload Size – Medium
Blurb Module – Title
- Text Orientation – Centered
- Font Weight – Bold
- Font Size – 24px
Free Quote Contact Form
Add a new Section with 1-row and 2-columns (right column wider), and include three Blurb Modules within the left column and a Contact Form within the second column. Create the first Blurb, customize, and then duplicate for the remaining two.
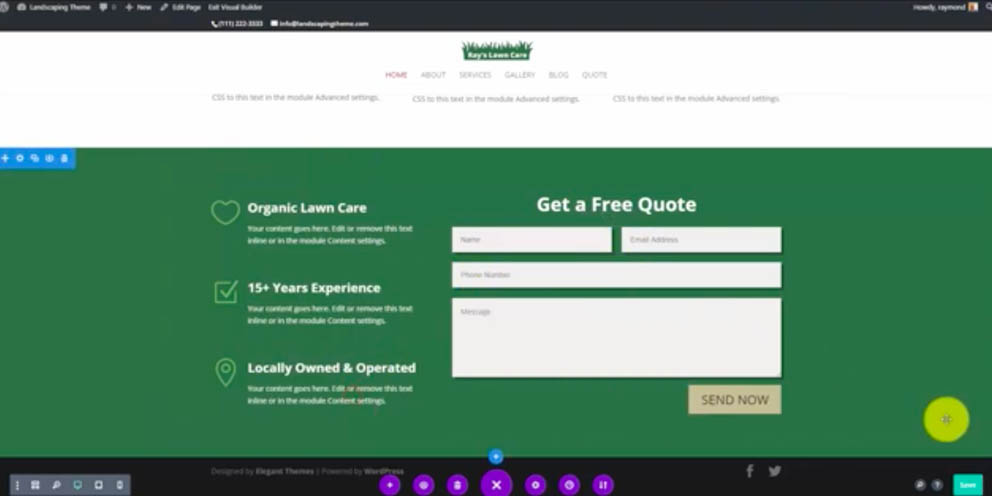
Section Settings
- Two-Columns – 1/3 first column, 2/3 second column
- Background Color– Green
Blurb Module – Image
- Enable “Use Icon” and Insert Heart Icon
- Icon Placement – Left
- Icon Font Size – 54px
- Icon Color – Light Green
Blurb Module – Text
- Font Color – White
- Font Weight – Bold
- Font Size – 24px
- Padding – 15px
Contact Form Module
- Add New Field – Phone Number
- Minimum & Maximum Length – 10 Characters
- Remove Captcha
- Title Font Color – White
- Title Font Weight – Bold
- Title Font Size – 36px
- Line Height – 1.5em
- Form Field – Add Box Shadow (5px)
- Button Font Color – Black
- Button Color – Tan
Customer Testimonials
Add a new Global Section with 1-row and 3-columns, and include three Blurb Modules. Include a Text Module for the headline above the blurbs. Create the first Blurb, customize, and then duplicate for the remaining two.
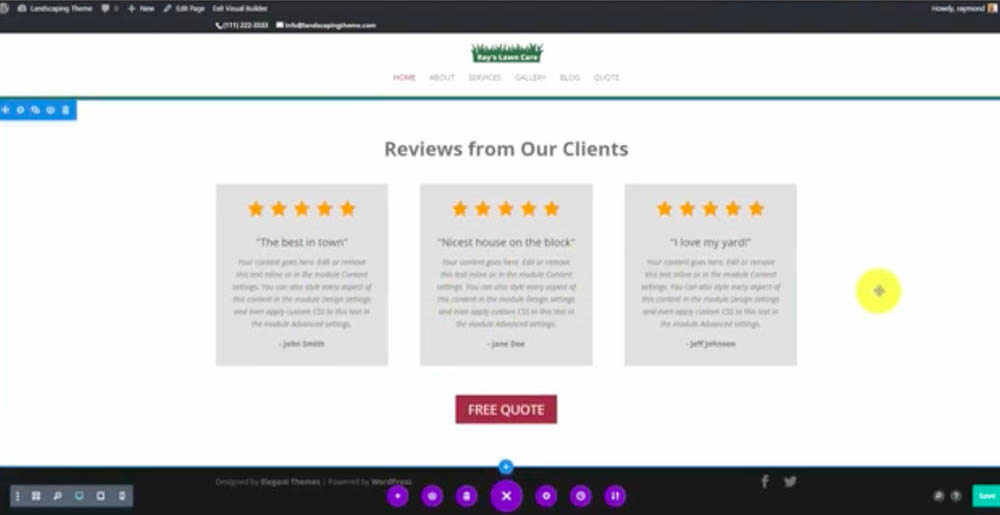
Section Settings
- Three Columns (equally spaced)
- Background – White
- Save Section as Global to Library (show on all pages)
Text Module – Headline
- Text Orientation – Centered
- Font Size – 36px
- Font Weight – Bold
Blurb Module – Image
- Upload Size – Medium
- Background Color – Light Grey
Blurb Module – Text
- Font Size (Title) – 20px
- Font Style – Bold, Italicized
- Text Orientation – Centered
- Padding – 30px
Button Module – Free Quote
- Font Color – White
- Background Color – Red
- Hover Icon – Arrow
- Link – Contact Form ID
Build Default Layout
The next page layout that we’ll create will be used for all the remaining pages other than the homepage.
Page With Sidebar Contact Form
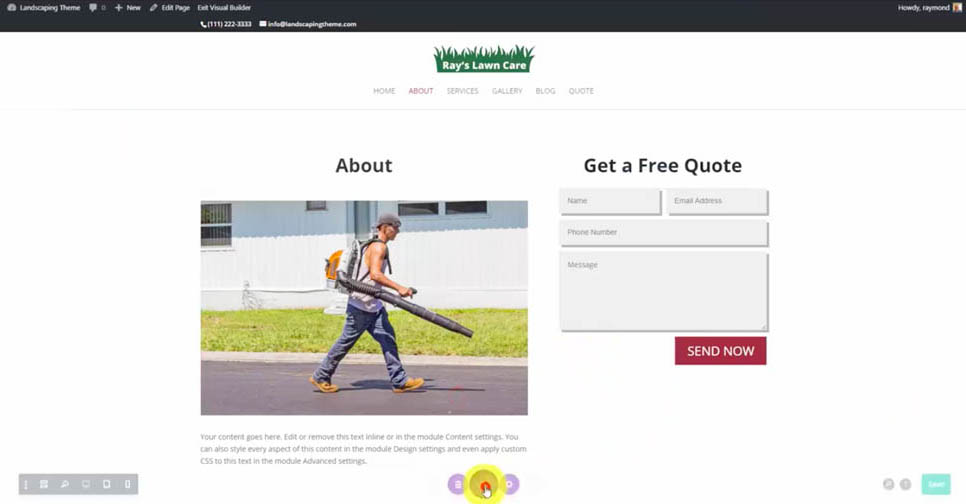
Section Settings
- Two Columns – 2/3 Left, 1/3 Right
Post Title Module
- Disable “Show Meta”
- Text Orientation – Centered
- Font Size – 36px
- Font Weight – Bold
Image Module
Text Module – Description
Contact Form Module
- Button Color – Red
- Button Text Color – White
- Title Font Color – Black
Call to Action
Add a Fullwidth Section with a Fullwidth Slider Module.

Fullwidth Slider Module
- Background Color – Green
- Image Upload Size – Large
- Button Color – Tan
- Button Text Color – Dark
- Button Border Width – 0
- Button Hover Icon – Checkmark
Customer Testimonials
We will finish our design by including the Global Section that we previously built on the Homepage. Select “Add From Library” to find out saved Global Section called “Client Reviews”.
We are done with our final page layout!
Click the “Save to Library” button on the Divi bottom dock, and save as “Default Sidebar Layout”.
You can now apply this pre-made layout to all of the inner pages, and customize the content modules on each of them.
To do this, open a new page and click “Load from Library” on the Divi bottom dock, navigate to the “Your Saved Layouts” tab, and select it.
Additional WordPress Plugins
- SEO by Yoast – Helps your pages rank within Google with good titles & descriptions.
- Pretty Links – Create easy to remember links that forward anywhere, i.e. yourdomain.com/facebook
- Duplicator – Create backups of your website and migrate to new web hosting
- Autoptimize – Combine website files and add lazy-loading for faster speed
- W3 Total Cache – Save versions of your website pages to optimize
Install Google Analytics
Google Analytics is a free software offered by Google to give you all the important data on your website traffic to help you improve and make better marketing decisions.
To install Google Analytics, you must have a Google account.
Select the “Admin” Gears icon and click “Account > Create New Account.”
Fill out the required fields including Account Name, Website Name, Website URL, and Time Zone.
Next, you must inject code into your website so Google can track your data on every page. To do this click “Property > Tracking Info > Tracking Code” and copy/paste the Global Site Tag into your website header.
There is a WordPress plugin to make this easy. Go to “Plugins > Add New” and search for “Insert Headers and Footers” then install the plugin.
Go to “Settings > Insert Headers and Footers” and paste the tracking code into the “Scripts in Header” text box. Check your Google Analytics reports in 1-2 days to confirm your website traffic is being logged.
Verify Google Search Console

Google Search Console is another free service offered by Google to help website owners maintain their website performance.
The Search Console tool shows you how often your website is appearing within Google search results, where it’s ranking, and how many clicks you’re getting. The application also gives you tons of essential data on keywords and search queries that drive traffic to your site.
You can leverage this data by optimizing existing pages/posts or creating new content around these search phrases.
To Install Google Search Console, click the “Start Now” button.
Add your website or property by entering your website URL, then click “Continue.”
NOTE: You’ll want to verify all four variations of your domain including HTTP/HTTPS & WWW/Non-WWW
Verify your website ownership using one of several methods. If you have Google Analytics installed, you should be able to simply use that as verification.
You can also upload an HTML file to your site. To do this click “Download This HTML Verification File” and use your FTP program to transfer to your web server.
After uploading the file, go back to Google Search Console to verify.
Your Website is Complete
This is where the fun really begins! I’m so glad you’ve made it this far, and you will continue to learn how all of these tools work together as you gain experience.
Sign-up for the WP101 video series to learn even more and get this tutorial sent directly to your inbox: